The scenario to deal with creating files in document libraries, adding/updating/deleting items in the SharePoint list, at times requirement emerges to perform some action on such events like sending notification, data manipulation on SharePoint lists or libraries, etc.
In SharePoint Development, there are two manners to achieve this – SharePoint Designer Workflow and Event Receivers. Of course we can use these techniques to achieve such requirement, but it runs on SharePoint server, i.e. business logic runs on the same server where SharePoint is installed, and event receivers do not support while working with Office 365 – SharePoint online. Few SharePoint programmers while consulting process may pitch to use different approaches like provider hosted-apps.
Cases where the business requirements are to keep business logic and SharePoint server segregated. Fortunately to deal with document libraries/lists on a host web (on which site we install application), it provides concept called Remote Event Receiver.If any list item is added/edited/deleted, and we want to perform any action like sending notification, we can use a remote event receiver.
So, let’s learn how to prepare provider hosted app and remote event receiver. We will host Provider Hosted application in Azure. Below are mentioned the steps to create remote event receiver.
Following are the tools to create remote Event Receiver:
- Visual Studio 2015
- SharePoint Online (Office 365)
- Azure Portal (For Deployment)
Step 1 – To Create Provider Hosted Application
- Open Visual studio
- Click on File New Project.
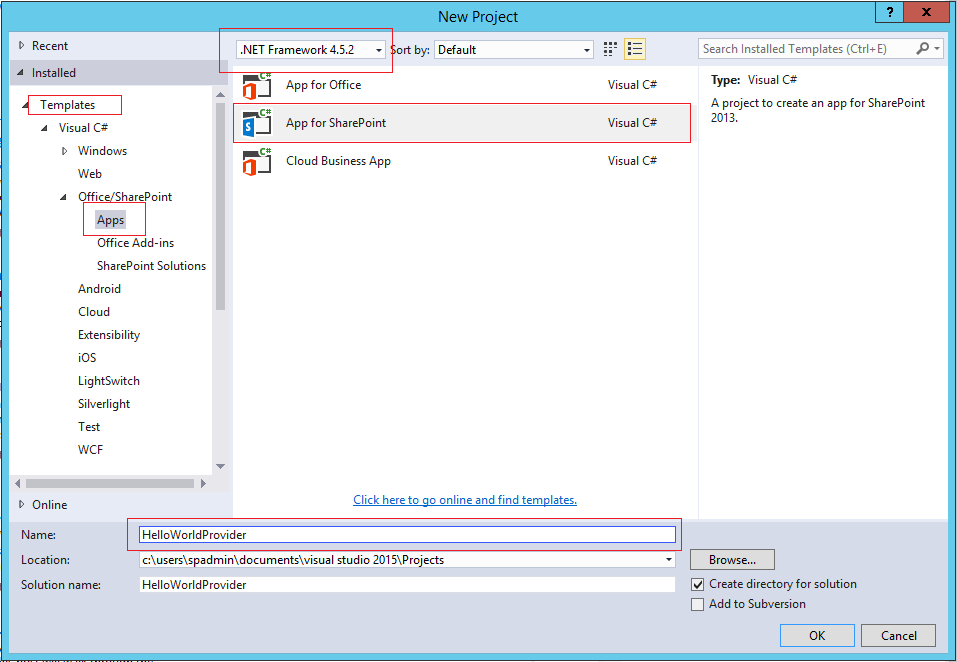
- Dialog box will appear. Select Templates then Visual C# then Office/SharePoint.
- Select “App for SharePoint”, make sure .Net framework 4.5 is selected, for more information review below screen shot and give application “HelloWorldProvider” name.
- Then choose a SharePoint developer site and then choose Provider-hosted like below. You can see below article to know how we can create a developer site in SharePoint, for more information review below screen shot, for security reasons we
have erased URL.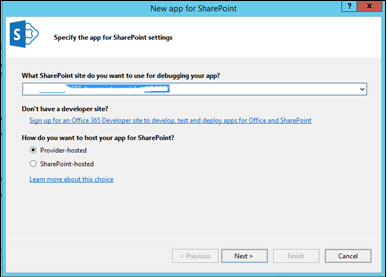
- Then it will ask to give credentials for the developer site and then select SharePoint Online Version.
- Then wizard will ask which type of provider application, we want to create either Asp.Net web forms or ASP.Net MVC application. Currently, we will select ASP.Net web forms.
- On the next screen selection option “Use Windows Azure Access Control Service (for SharePoint cloud apps)”.
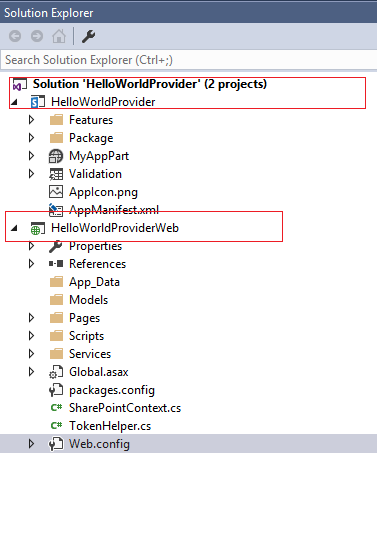
- It will take some time and it will create two projects in one solution, one is for the SharePoint add-in and the other will be ASP.NET web forms project, review below image for more information:
- We need to attach event receiver to the list of host web (where we install add-in), so to achieve this, select add-in project from the solution and from the properties of the project set “Handle App Installed” to ‘true’:
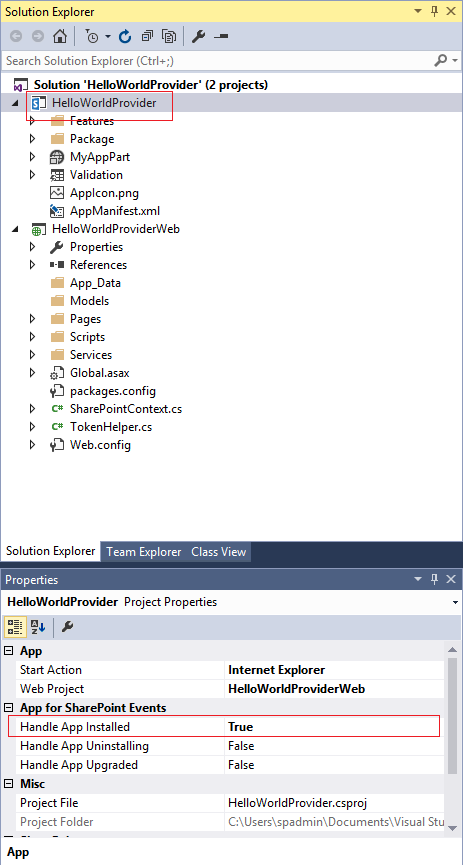
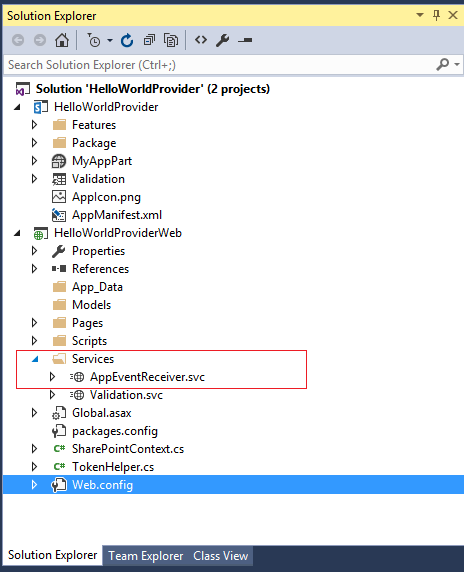
- After setting “Handle App Installed” property to true, AppEventReceiver.svc will be added inside the Services folder like below: We are going to write code to attach remote event receiver to host web’s list.
Step 2 – To Add Remote Event Receiver to project
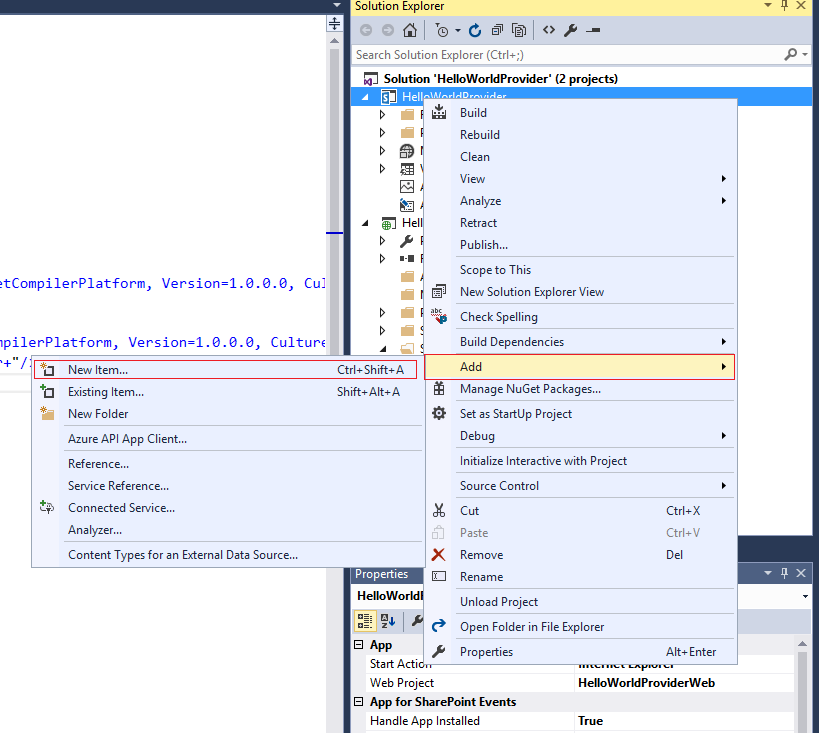
- Add Remote Event Receiver. Right click on the Add-in project then Add then New Item.
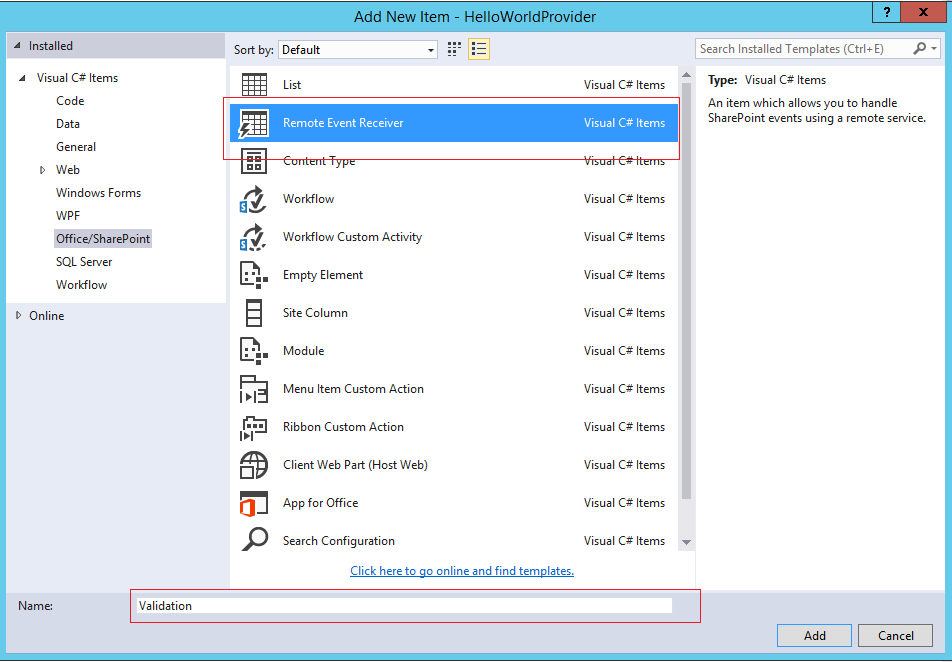
- Give it name “Validation”.
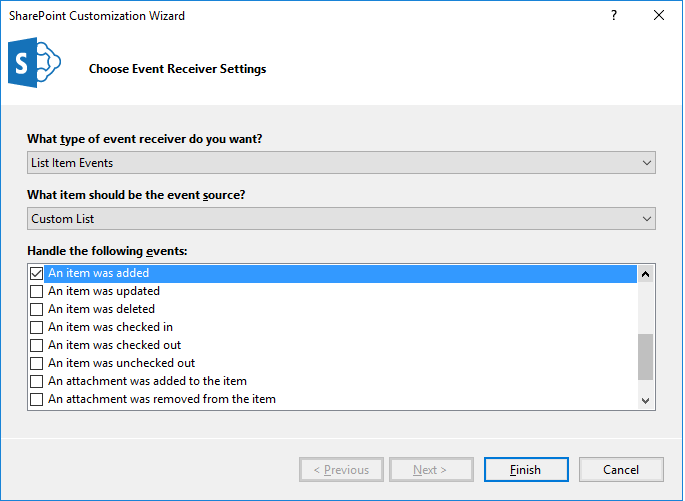
- Select List Item Events, event source as Custom List and then event as “An Item was added”, which means some action on the host web’s list will be performed when an item is added in that list.
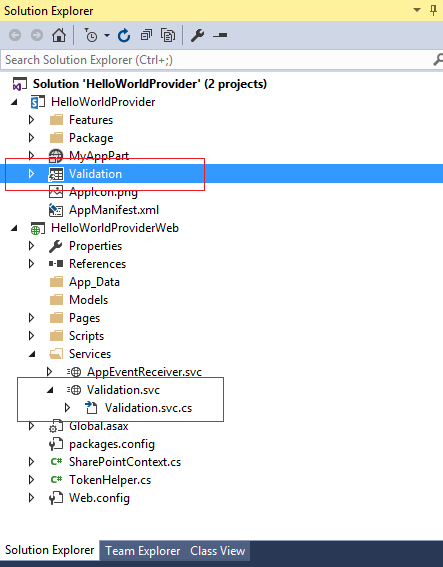
- Validation.svc file will be added to add-in project as well as inside the service folder of the asp.net web forms project. Review below image:
Step 3 – To Generate Client ID & Client Secret
- To establish trust with the provider hosted web, we need to generate the Client ID and Client Secret. So navigate to the _layouts/15/appregnew.aspx pageExample: https://test.sharepoint.com/sites/devsite/_layouts/15/appregnew.aspx
- Click on the Generate button for the Client Id and Client Secret fields to generate them respectively. Enter a title and in App Domain put the website that is created in azure (without https). Lastly, enter the Redirect URI which is the website
URL, make sure to give in https.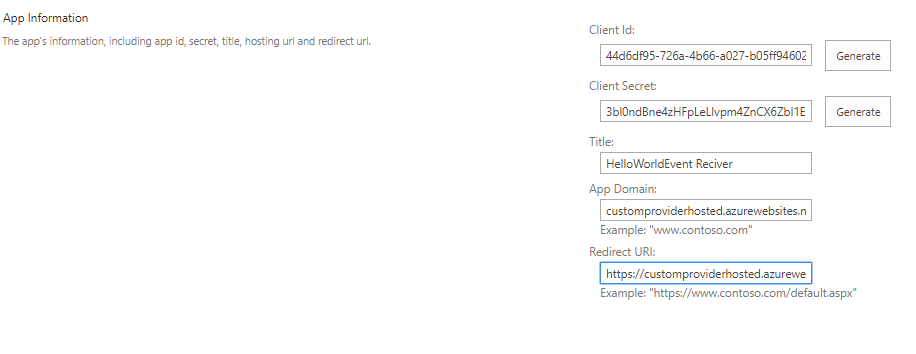
- Open the web.config file and replace the Client Id and Client Secret which we have generated in the above page. Note: Before modifying the web.config file, take its backup.
- On AppManifest.xml, Right Click then View Code and add following code:
<AppPermissionRequests AllowAppOnlyPolicy="false">
    <AppPermissionRequest Scope="http://sharepoint/content/sitecollection/web" Right="FullControl" />
</AppPermissionRequests>
|
<AppPermissionRequests AllowAppOnlyPolicy=”false”> <AppPermissionRequest Scope=”http://sharepoint/content/sitecollection/web” Right=”FullControl” /> </AppPermissionRequests>
Also add client ID same as above
Step 4 – To Add Code to AppEventReceiver
In ASP.Net Web forms project inside the service folder’s AppEventReceiver.svc.cs file, we will add the code to attach the event receiver to the host list. The code will be added in the ProcessEvent event for the AppInstalled event.
public SPRemoteEventResult ProcessEvent(SPRemoteEventProperties properties)

{

try

{

SPRemoteEventResult result = new SPRemoteEventResult();


using (ClientContext clientContext = TokenHelper.CreateAppEventClientContext(properties, useAppWeb: false))

{

if (clientContext != null)

{

clientContext.Load(clientContext.Web);

clientContext.ExecuteQuery();


if (properties.EventType == SPRemoteEventType.AppInstalled)

{

//Get reference to the host web list with name Feedback

var documentsList = clientContext.Web.Lists.GetByTitle("MDLIB");

clientContext.Load(documentsList);

clientContext.ExecuteQuery();

string remoteUrl = "https://customproviderhosted.azurewebsites.net/Services/Validation.svc";

//Create the remote event receiver definition

EventReceiverDefinitionCreationInformation remoteEventReceiver1ItemAdded = new EventReceiverDefinitionCreationInformation()

{

EventType = EventReceiverType.ItemUpdated,

ReceiverAssembly = Assembly.GetExecutingAssembly().FullName,

ReceiverName = "ValidationItemAdded",

ReceiverClass = "Validation",

ReceiverUrl = remoteUrl,

SequenceNumber = 10000,

};


//Add the remote event receiver to the host web list

documentsList.EventReceivers.Add(remoteEventReceiver1ItemAdded);

clientContext.ExecuteQuery();

}

}

}

}

catch (Exception ex) {

SPDiagnosticsService.Local.WriteTrace(0, new SPDiagnosticsCategory("Remote Event Receiver - Error Report", TraceSeverity.High, EventSeverity.ErrorCritical), TraceSeverity.High, ex.Message, string.Empty);

}

return result;

}
|
public SPRemoteEventResult ProcessEvent(SPRemoteEventProperties properties) { try { SPRemoteEventResult result = new SPRemoteEventResult(); using (ClientContext clientContext = TokenHelper.CreateAppEventClientContext(properties, useAppWeb: false))
{ if (clientContext != null) { clientContext.Load(clientContext.Web); clientContext.ExecuteQuery(); if (properties.EventType == SPRemoteEventType.AppInstalled) { //Get reference to the host web list with name Feedback var documentsList = clientContext.Web.Lists.GetByTitle(“MDLIB”);
clientContext.Load(documentsList); clientContext.ExecuteQuery(); string remoteUrl = “https://customproviderhosted.azurewebsites.net/Services/Validation.svc”; //Create the remote event receiver definition EventReceiverDefinitionCreationInformation
remoteEventReceiver1ItemAdded = new EventReceiverDefinitionCreationInformation() { EventType = EventReceiverType.ItemUpdated, ReceiverAssembly = Assembly.GetExecutingAssembly().FullName, ReceiverName = “ValidationItemAdded”, ReceiverClass = “Validation”,
ReceiverUrl = remoteUrl, SequenceNumber = 10000, }; //Add the remote event receiver to the host web list documentsList.EventReceivers.Add(remoteEventReceiver1ItemAdded); clientContext.ExecuteQuery(); } } } } catch (Exception ex) { SPDiagnosticsService.Local.WriteTrace(0,
new SPDiagnosticsCategory(“Remote Event Receiver – Error Report”, TraceSeverity.High, EventSeverity.ErrorCritical), TraceSeverity.High, ex.Message, string.Empty); } return result; }
Above code will attach remote event receiver to the list named “MDLIB” which will be in host web (i.e. where provider hosted app is going to be installed).
Step 5 – To Add Code to Validation Remote Event Receiver
In ASP.Net web forms project inside the service folder’s Validation.svc.cs file, we will add the code to instruct event receiver to updated description field of ‘MDLIB’ list when item added.
The code will be added in the ProcessOneWayEvent event.
public void ProcessOneWayEvent(SPRemoteEventProperties properties)

{

if (properties.EventType == SPRemoteEventType.ItemAdded)

{

using (ClientContext clientContext = TokenHelper.CreateRemoteEventReceiverClientContext(properties))

{

if (clientContext != null)

{

try

{


List lstDemoeventReceiver = clientContext.Web.Lists.GetByTitle(properties.ItemEventProperties.ListTitle);

ListItem itemDemoventReceiver = lstDemoeventReceiver.GetItemById(properties.ItemEventProperties.ListItemId);


itemDemoventReceiver["Description"] = " updated by remote event reciever =>; " + DateTime.Now.ToString();

itemDemoventReceiver.Update();

clientContext.ExecuteQuery();

}

catch (Exception ex) {

SPDiagnosticsService.Local.WriteTrace(0, new SPDiagnosticsCategory("Remote Event Receiver - Error Report", TraceSeverity.High, EventSeverity.ErrorCritical), TraceSeverity.High, ex.Message, string.Empty);

}

}

}

}

}
|
public void ProcessOneWayEvent(SPRemoteEventProperties properties) { if (properties.EventType == SPRemoteEventType.ItemAdded) { using (ClientContext clientContext = TokenHelper.CreateRemoteEventReceiverClientContext(properties)) { if (clientContext
!= null) { try { List lstDemoeventReceiver = clientContext.Web.Lists.GetByTitle(properties.ItemEventProperties.ListTitle); ListItem itemDemoventReceiver = lstDemoeventReceiver.GetItemById(properties.ItemEventProperties.ListItemId); itemDemoventReceiver[“Description”]
= ” updated by remote event reciever =>; ” + DateTime.Now.ToString(); itemDemoventReceiver.Update(); clientContext.ExecuteQuery(); } catch (Exception ex) { SPDiagnosticsService.Local.WriteTrace(0, new SPDiagnosticsCategory(“Remote Event Receiver
– Error Report”, TraceSeverity.High, EventSeverity.ErrorCritical), TraceSeverity.High, ex.Message, string.Empty); } } } } }
Step 6 – To Deploy Provider Hosted App to Azure
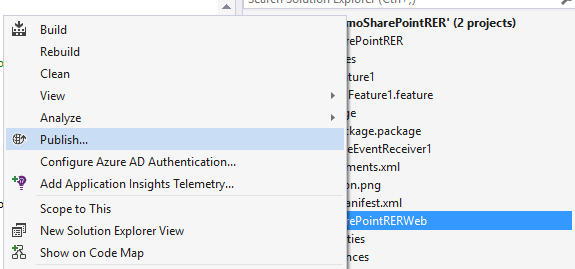
- Right click on the asp.net forms web project and then click on Publish.
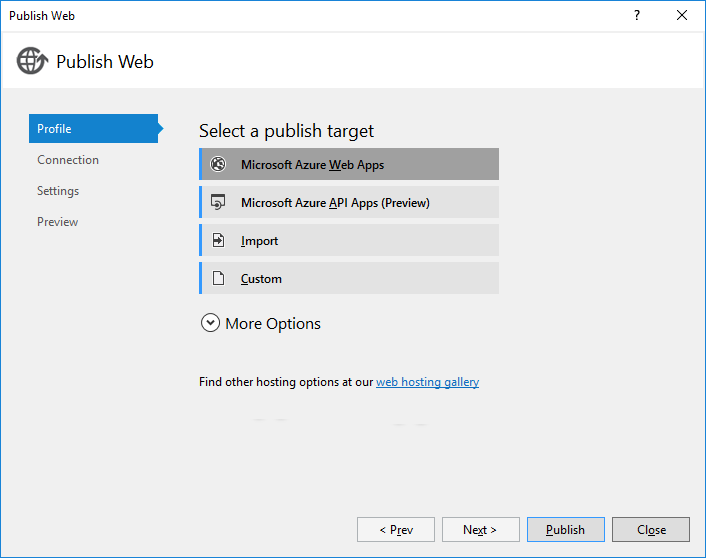
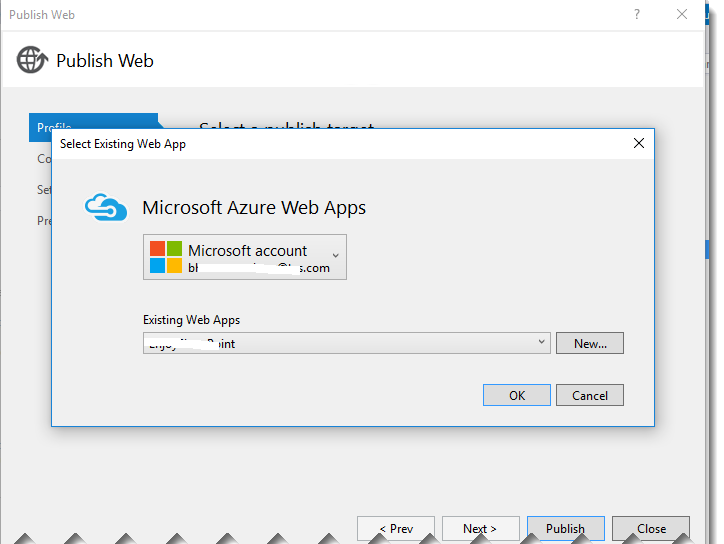
- Public web project dialog will appear, click on Microsoft Azure Web Apps.
- It will ask to login into azure account, it will display all the web apps. Choose the particular web apps like below:
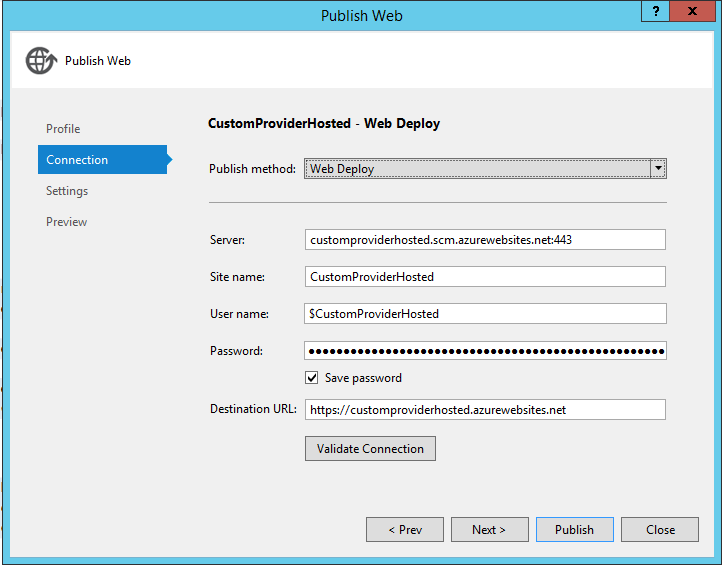
- Publish method, Server, Site name, User name, Password and Destination URL will be appeared in next screen. Validate the connection and once it is successful.
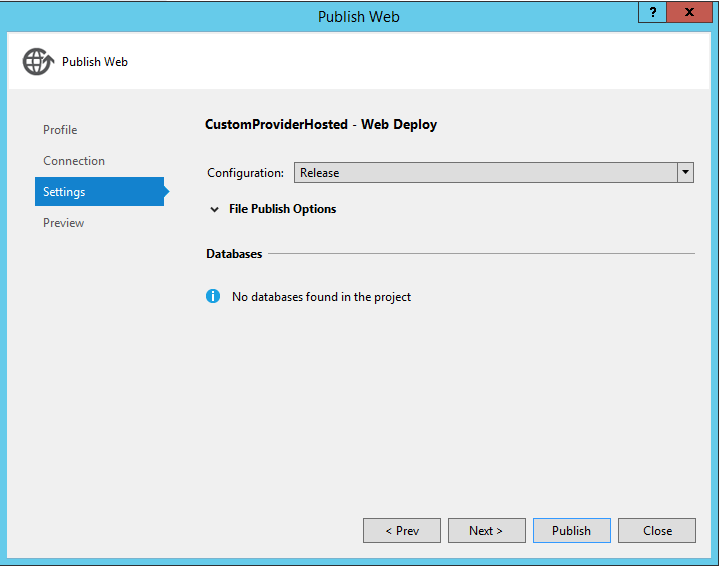
- Click on the Next.
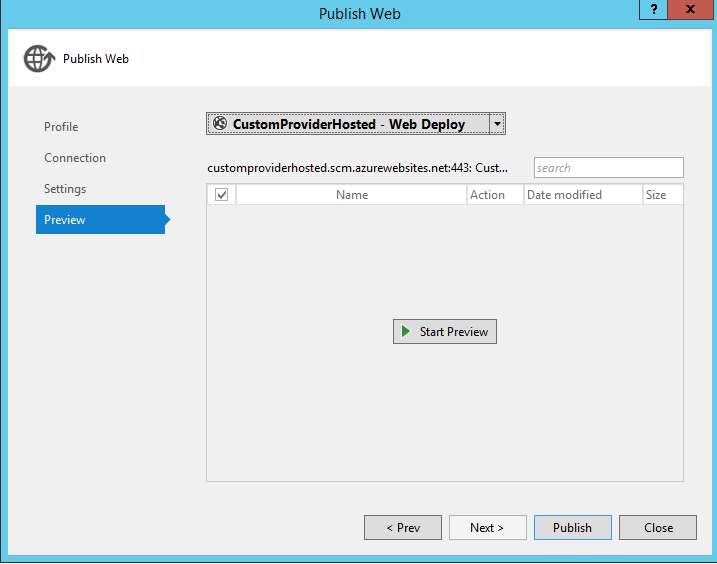
- To verify all the files, you can also click on the Start Preview button to see the preview.
Step 7 – To Publish App Package
Now asp.net web project is published to azure web portal, now it’s time to prepare package for the SharePoint add-in.
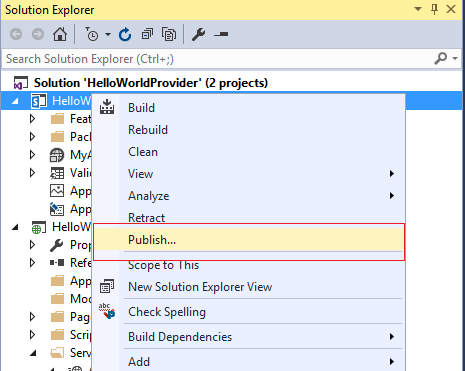
- Right-click on the Add-in Project and click on Publish.
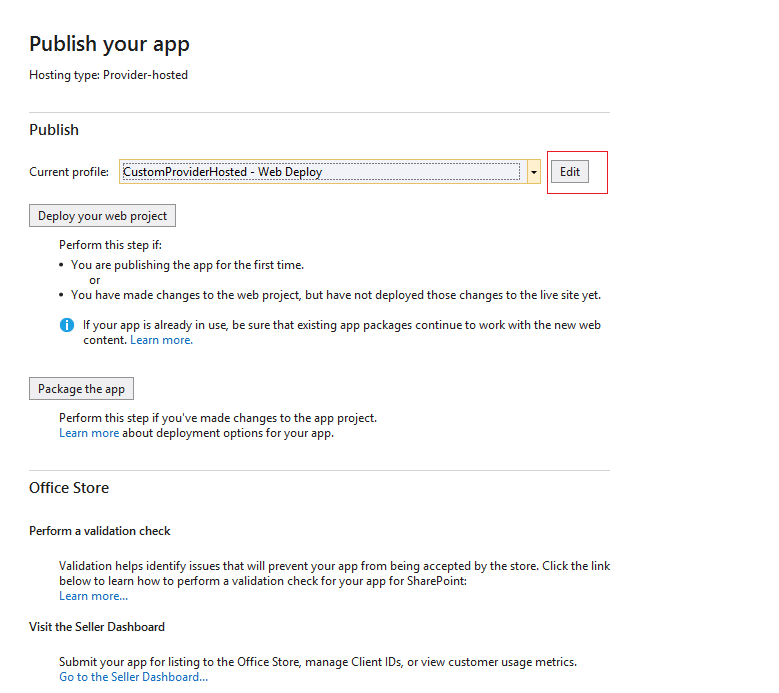
- Publish your app page will appear, then click on the Edit button like below:
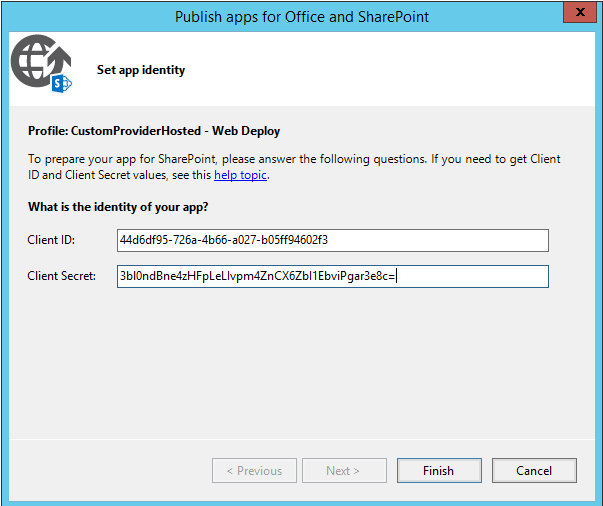
- It will ask Client ID & Client Secret, write down both the same as we replaced into the web.config file.
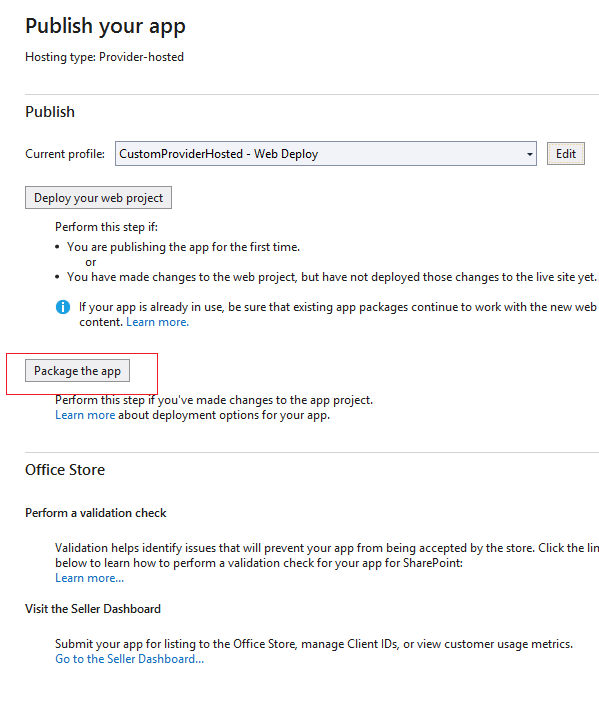
- Click on Package App, make sure that it is in release mode.
- Here the website and Client Id will be populated by default. Click on Finish button which will generate the .app
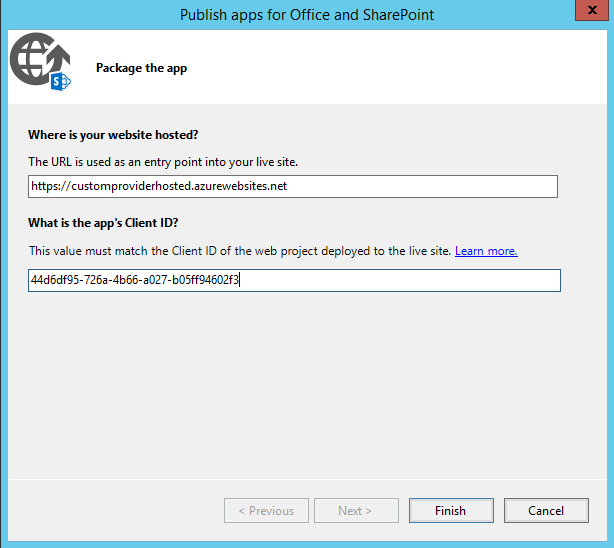
- It will open folder with package file (.app file).
- Open App Catalog site, go to Site Contents à Apps for SharePoint à Upload the .app file
Reference Sites:
- App Catalog Site – https://docs.microsoft.com/en-us/sharepoint/use-app-catalog
- Create developer site – https://docs.microsoft.com/en-us/sharepoint/dev/sp-add-ins/create-a-developer-site-on-an-existing-office-365-subscription
Step 8 – To Test Remote Event Receiver
- Go to site content of the developer site, and add an application.
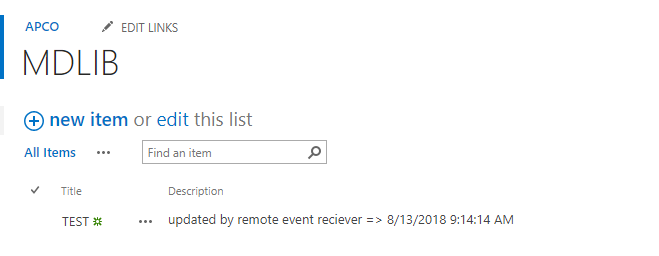
- After the app is installed successfully, open the list and add an item to the list. Enter only Title and the Description will be added automatically by the remote event receiver like as shown below:
Conclusion
For the challenges part, there are few of them if the development is done using SharePoint Designer Workflow, but for Provider Hosted app it is way easier and safer as the business logic is not disclosed openly because it is hosted on separate individual server. Though details of each log can’t be maintained on the server as it is an individual server, yet the process is more streamlined and robust.



Comments
Leave a message...