In the real world, the HR department is responsible in any organization to appoint new employee. Once he/she appoints any employee then he/she requires to contact Network Administrator and SharePoint Administrator. A Network Administrator creates this user in the AD, assign him into OU (if require) and AD group, and a SharePoint Administrator assigns this user into appropriate SharePoint group to provide him access on the organization SharePoint site. Thus, a chronological sequence is required to follow and it is time-consuming.
If HR department is having appropriate permission to access the organization SharePoint site then they can perform the tasks on behalf of Network and SharePoint Administrators through SharePoint itself via a web-part, an application page or an event receiver. Thus, the HR department can get rid of the above chronological sequence.
Before providing access to a new user in a SharePoint site, an organized user is required to perform certain steps as mentioned below:
- Create a user in Active Directory
- Add a user in Organizational Unit (if require)
- Add a user in Active Directory group
- Add a user in a SharePoint group
Ideally, the Active Directory tasks (steps 1 to 3) are performed by a user who is having permission on Active Directory Domain Services. Step 4 can be performed by a user who is having access to manage users in SharePoint groups of a SharePoint site.
Let’s see how one can provide this functionality in SharePoint site.
Note: The yellow highlighted points in below code are configurable as per the user requirement. This information must be kept somewhere where one can easily manage them. E.g. web.config, app.config, SharePoint list etc.
Code Example
Let’s create a console application in C# to create users in the AD and assign them into SharePoint Group. The developer can also add a piece of code in SharePoint web-part, an application page or an event receiver with required modification.
First, get all the required user information from an end user and use them to create a user.
Try
       {
  // fetch the user details from input
                Console.Write("Enter First name: ");
                var firstName = Console.ReadLine();
                Console.Write("Enter Last name: ");
                var lastName = Console.ReadLine();
                Console.Write("Enter Login name: ");
                var loginName = Console.ReadLine();
                Console.Write("Enter Employee ID: ");
                var employeeID = Console.ReadLine();
                Console.Write("Enter Email: ");
                var email = Console.ReadLine();
                Console.Write("Enter Phone number: ");
                var phoneNumber = Console.ReadLine();
                Console.Write("Enter Address: ");
                var address = Console.ReadLine();

                AddUserInSharePoint(firstName, lastName, loginName, employeeID, email, phoneNumber, address);
            }
       catch (Exception ex)
       {
            Console.WriteLine("Error: " + ex.Message);
       }
       Console.ReadLine();
|
Add User in SharePoint
public static void AddUserInSharePoint(string firstName, string lastName, string userLogonName, string employeeID, string emailAddress, string telephone, string address) { try { bool status = CreateUser(firstName, lastName, loginName, employeeID, email, phoneNumber, address); if (status) { PrincipalContext AD = new PrincipalContext(ContextType.Domain, "your domain", "User Name", "Password"); UserPrincipal u = new UserPrincipal(AD); // search for user PrincipalSearcher search = new PrincipalSearcher(u); UserPrincipal result = (UserPrincipal)search.FindOne(); search.Dispose(); //Enter user to SharePoint group if (result != null) { AddUserToDirectoryGroup(result.UserPrincipalName, "AD Group Name", "Your Domain", "DC=DC,DC=DC"); AddUserToSharePointGroup(result.SamAccountName, "SP Group Name"); // SamAccountName = User's AD login name } } } catch (DirectoryServicesCOMException ex) { Console.WriteLine("Error: " + ex.Message); } } |
Create User
private static bool CreateUser(string firstName, string lastName, string userLogonName, string employeeID, string emailAddress, string telephone, string address) { // Creating the PrincipalContext PrincipalContext principalContext = null; try { principalContext = new PrincipalContext(ContextType.Domain, "your domain", "DC=DC,DC=DC"); } catch (Exception ex) { Console.WriteLine("Error: " + ex.Message); throw ex; } // Check if user object already exists in the store UserPrincipal usr = UserPrincipal.FindByIdentity(principalContext, userLogonName); if (usr != null) { return false; } // Create the new UserPrincipal object UserPrincipal userPrincipal = new UserPrincipal(principalContext); if (lastName != null && lastName.Length > 0) { userPrincipal.Surname = lastName; } if (firstName != null && firstName.Length > 0) { userPrincipal.GivenName = firstName; } if (employeeID != null && employeeID.Length > 0) { userPrincipal.EmployeeId = employeeID; } if (emailAddress != null && emailAddress.Length > 0) { userPrincipal.EmailAddress = emailAddress; } if (telephone != null && telephone.Length > 0) { userPrincipal.VoiceTelephoneNumber = telephone; } if (userLogonName != null && userLogonName.Length > 0) { userPrincipal.SamAccountName = userLogonName; } string pwdOfNewlyCreatedUser = "abcde@@12345!~"; //Random or auto-generated password can be assigned. userPrincipal.SetPassword(pwdOfNewlyCreatedUser); userPrincipal.Enabled = true; userPrincipal.ExpirePasswordNow(); try { userPrincipal.Save(); } catch (Exception ex) { Console.WriteLine("Error: " + ex.Message); return false; } if (userPrincipal.GetUnderlyingObjectType() == typeof(DirectoryEntry)) { DirectoryEntry entry = (DirectoryEntry)userPrincipal.GetUnderlyingObject(); if (address != null && address.Length > 0) { entry.Properties["streetAddress"].Value = address; } try { entry.CommitChanges(); } catch (Exception ex) { Console.WriteLine("Error: " + ex.Message); return false; } } return true; } |
Add User to Directory Group
public static void AddUserToDirectoryGroup(string userId, string groupName, string domain, string domainController) { try { using (PrincipalContext pc = new PrincipalContext(ContextType.Domain, domain, domainController)) { GroupPrincipal group = GroupPrincipal.FindByIdentity(pc, groupName); group.Members.Add(pc, IdentityType.UserPrincipalName, userId); group.Save(); } } catch (DirectoryServicesCOMException ex) { Console.WriteLine("Error: " + ex.Message); } } |
Add User to SharePoint Group
private static void AddUserToSharePointGroup(string userLoginName, string userGroupName) { //Executes this method with Full Control rights even if the user does not otherwise have Full Control SPSecurity.RunWithElevatedPrivileges(delegate { using (SPSite spSite = new SPSite("Your site url")) { using (SPWeb spWeb = spSite.OpenWeb()) { try { //Allow updating of some sharepoint lists, (here spUsers, spGroups etc...) spWeb.AllowUnsafeUpdates = true; SPUser spUser = spWeb.EnsureUser(userLoginName); if (spUser != null) { SPGroup spGroup = spWeb.Groups[userGroupName]; if (spGroup != null) { spGroup.AddUser(spUser); } } } catch (Exception ex) { Console.WriteLine("Error: " + ex.Message); } finally { spWeb.AllowUnsafeUpdates = false; } } } }); } |
Output
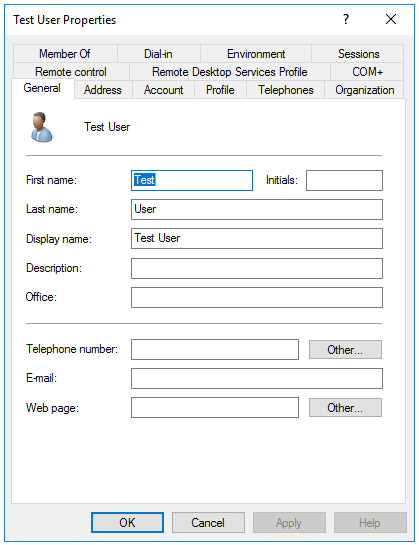
On successful execution of the AddUserInSharePoint method, the user will be added to the Active directory. You can verify the same by logging into the Active Directory. Refer the below screenshots for same.

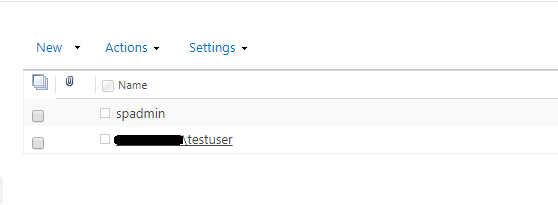
On completion of AddUserToSharePointGroup method, the user will be added to a SharePoint group as shown in the screenshot below.
Conclusion
A new user can be created and assigned into the respective AD and SharePoint groups by a user who is having appropriate permission on a SharePoint site. The various information related to the user which is provided at a creation time can be viewed in SharePoint if the User Profile Synchronization Service is configured. Various operations can be performed in AD and SharePoint related to a user management.
This blog is a continuation in the series of blogs for implementing offline capability in PowerApps with SharePoint.
In the first part, we streamlined the process to enable and configure offline capabilities in your applications.
Here, we’ll determine the behavior of an offline app. We’ll look at how to cache data locally and display the cached data when the app becomes offline. We’ll develop a system to handle offline addition, updaAdd a new record in a mobile device when the internet connection is not available.ting, and deletion of data and build a conflict resolution screen, wherein SharePoint programmer can retain the offline record or revert to the most recent version of the record.
If you require your app to be fully functional offline, it is a must to handle offline record deletion and edit. Apart from that, in cases where you lose internet connectivity for an extended period of time, other users may update same records which you have deleted.
We can build a Conflict Resolution screen to prevent users from overwriting their changes and avoid data conflicts. In a case where data conflicts exist, the user can retain or discard offline changes using this screen.
Capture New Books or Update an Existing Record
There are numerous changes we need to make to save icon of the edit screen in order to handle offline data edits and data entries.
The approach is to override the use of SubmitForm function to save the book in the BooksCollection collection because we need to allocate a temporary id to enable us to edit or delete records created in offline mode.
Override code of the OnSelect property of Save icon containing SubmitForm function inside the edit screen.
Below are the high-level steps to accomplish this
- Assign values based on whether the user is adding or editing a record.
- Retrieve form values entered by user and access form values using Updates property.
- Load the next available temporary id.
- If the connection is available, update “Best Books” list and store returned record inside it. “BooksRecord” collection using Patch operation. Refer link to know more about Patch function: https://docs.microsoft.com/en-us/powerapps/maker/canvas-apps/functions/function-patch
- If the connection is not available, patch the record inside “BooksRecordOffline” collection.
- Uniquely identify records that are created offline by setting id which is generated earlier.
- Include “Modified” field for offline data updates to check for conflicts during the synchronization process.
- Sync “BooksCollection” collection.
- If connection is available, patch “BooksRecord” to “BooksCollection” collection.
- If the connection is not available, patch “BooksRecordOffline” collection.
Add a Record Offline
Carry out the demo given below to add a record in offline mode in a mobile device after configuring the whole app.
- Add a new record in a mobile device when the internet connection is not available.

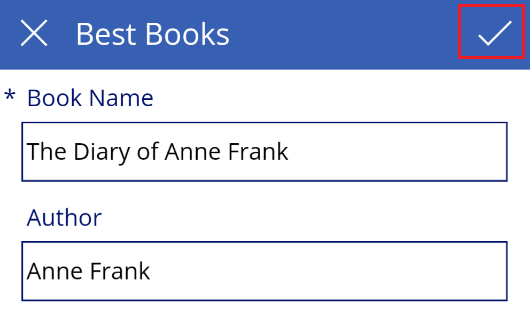
- Add a “Book Name” and “Author” and click Submit icon. Close the app.
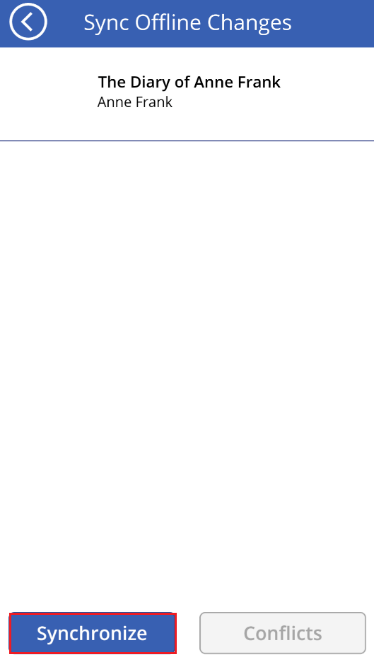
- Open the app when the internet connection is available and click on sync icon to navigate to SyncScreen.

- You can view the record you created in offline mode on the sync screen. Click on the Synchronize button to add the record to the database.
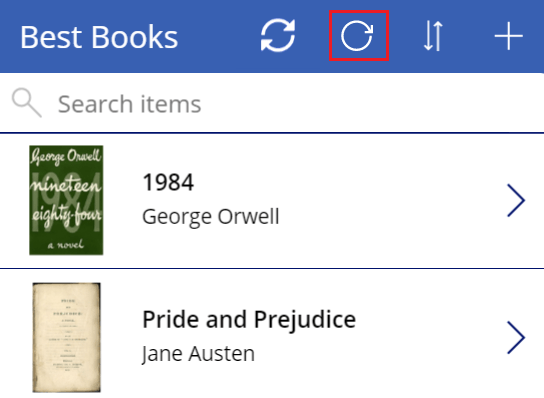
- Navigate to the browser screen by clicking Back button and click on Refresh icon to view the newly added record.

Update a Record Offline
Carry out the demo given below to update a record in offline mode in a mobile device after configuring the whole app.
- Navigate to details screen of a particular record to update its properties.

- Edit a record in offline mode from a mobile device.
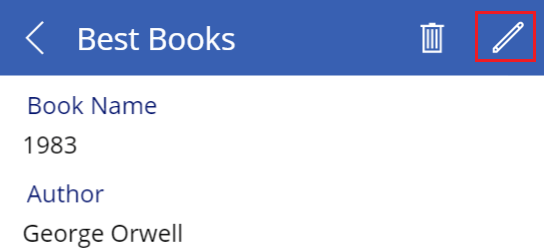
- Edit a field associated with the record and click on the Submit button. Close the app.
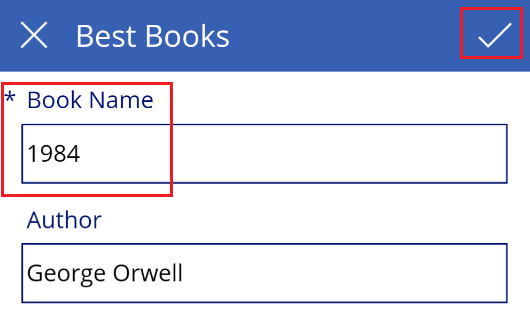
- Once the internet connection is available, open the app and click on Sync icon to navigate to sync screen.

- You can view record updates on the sync screen. Click Synchronize to apply the changes.
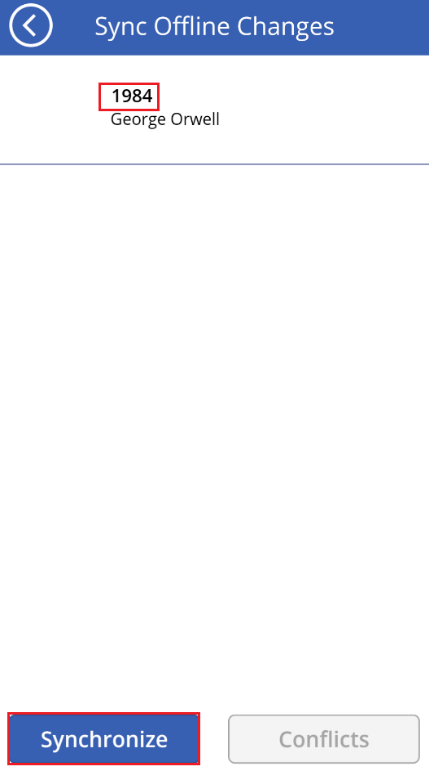
- Click Back icon and refresh the browse screen to view your changes.
Handling Offline Deletions
An app should handle offline deletion of data for it to meet all the functional requirements. The details screen provides a delete icon.
The most common way to delete an item from a local collection is to remove an item by a unique identifier.
We need to add code to the OnSelect rule of Delete icon on the details screen.
Below are the high-level steps to accomplish this:
- Remove record from local BooksCollection.
- Check whether the internet connection is available or not.
- If the connection is available, remove the record from “Best Books” list
- If the internet connection is not available, collect data in BooksChanges collection which keeps track of offline changes.
- Save data to offline file to retain an offline modifications.
Carry out the demo given below to delete record in offline mode in a mobile device after configuring the whole app.
- Navigate to details screen for a particular record.
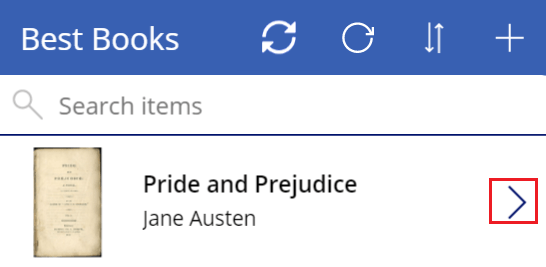
- Delete a record in offline mode from a mobile device.
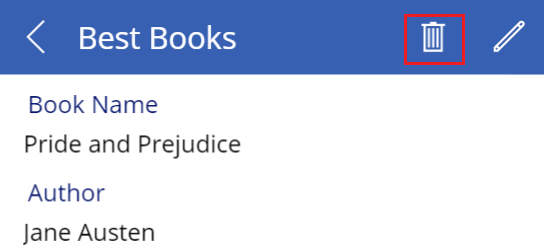
- Close the app and re-open “Best Books” app when the internet connection is available.
- Click sync icon to navigate to SyncScreen.

- You can view the record deleted in offline mode.
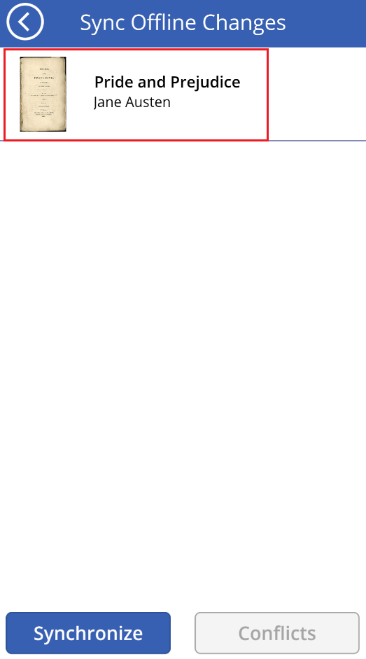
- Click the Synchronize button in order to process offline deleted record, click the Back button and then refresh the browser screen. You can see that the record is removed from the view. You can also check by navigating to the SharePoint list to check whether the record is deleted.
Conflict Resolution
We can create a screen to provide a means for users to resolve data conflicts if the synchronization process faces records in a conflicted state.
- Create a screen named “ConflictResolutionScreen” of type Scrollable. Delete the canvas inside the screen. Rename the label text at the top to “Resolve conflicts’. Remove “Next” arrow as it is not required.
- Add a gallery control of type Vertical inside the screen and adjust size of the control. Name the control “BooksConflict” and set its Item property to BooksChangesConflict.
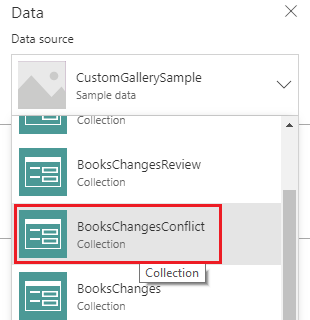
- Show the desired fields using the syntax ThisItem.OfflineRecord.<Fieldname>

- Similarly set Text properties of other two fields “Book Name” and “Author”
- Add two button controls named “Retain” and “Discard” to item of the gallery control to enable users to keep or discard offline changes. Add a “Back” button inside the screen
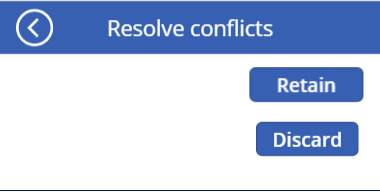
- Two button controls “Retain” and “Discard” are displayed for each conflicted item on the “ConflictResolutionScreen” screen.
- Add formula on the OnSelect property of the discard button to remove offline version of record to keep record server version.

- Patch the offline record to SharePoint list to keep offline version of record. For that, add code to OnSelect action of retain button on conflict resolution screen.
- Add formula to the OnSelect action of the back button on conflicts resolution screen to navigate on Sync screen.
Walkthrough for Resolving Conflicts
Carry out the demo given below to retain/discard conflicting records processed in offline mode in a mobile device after configuring the whole app.
- Navigate to details screen for a particular record and edit a record in offline mode from a mobile device.
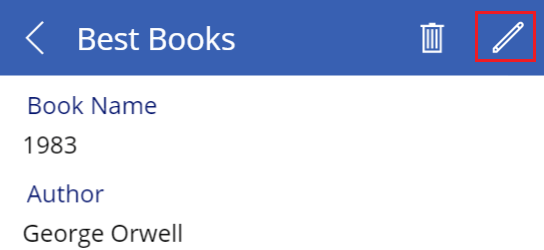
- Edit a field associated with the record and click on Submit button.
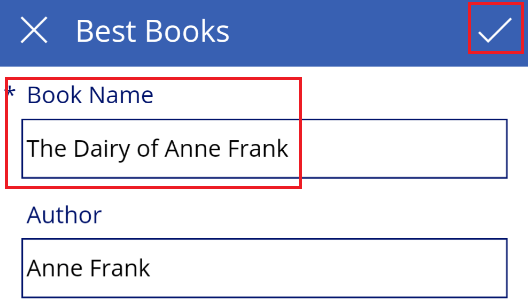
- Again delete the record for which you made update earlier. Close the app.
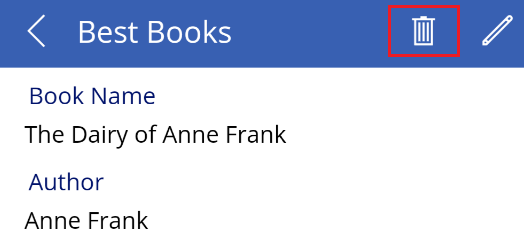
- Once the internet connection is available, click on Sync icon to navigate to sync screen.

- You can view conflicting records on the sync screen. Click on “Synchronize” button.
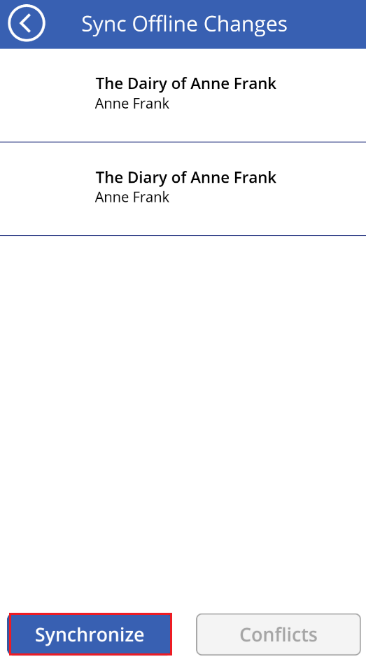
- Once you click on “Synchronize” button, “Conflicts” button is enabled and the conflicted records will be moved to conflict resolution screen. Click “Conflicts” button to resolve the conflicts.
Note: In the case of non-conflicting offline records, they will be processed into SharePoint list.
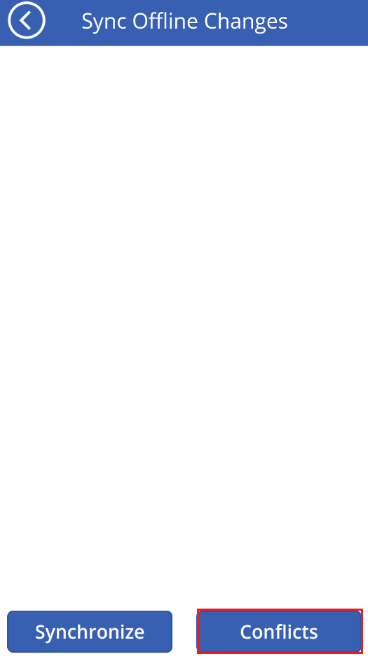
- On the conflict resolution screen, choose whether to discard or retain the changes for conflicting records.
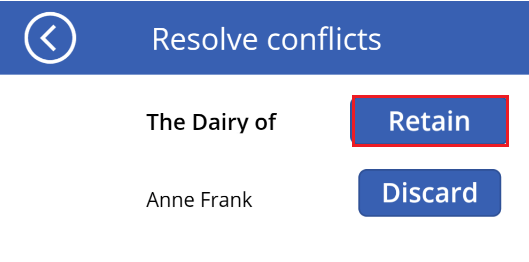
- If you click “Retain” button and select Refresh icon on the browser screen, it will keep the updates as shown below else if you click “Discard”, it will discard the changes.

Save and Publish your App
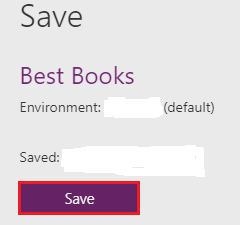
- Once you are done developing offline-capable PowerApp with SharePoint, open File menu and then click Save.
- Finally, Publish your app.
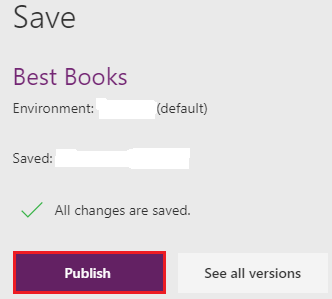
Once published, you can view your PowerApp and work with your SharePoint Online list from your phone.
We are done building PowerApp with basic offline capabilities with SharePoint Online list. Your user can now view books cached earlier and can even create, update and delete books without internet connection, and to sync later when online. Ensure that the user has to open “Best Books” app at least once on the mobile device, so that “Best Books” SharePoint list is cached.
Conclusion
Building offline capable apps can make SharePoint development even more engaging for mobile users, especially when SharePoint developers are traveling to remote places with spotty internet connection availability. This series of blogs guided through the steps to build capabilities in your app that work offline. Once an app becomes offline, the browser screen shows data that was cached earlier when app was online.
In case of offline data updates, we saw how to save changes to local file. Once the app retains internet connection, we can patch offline changes to SharePoint list.
We also had a look at how to handle data conflicts by examining last modified date of the record. We processed conflicting record to a collection, which allows users to choose whether to keep or discard conflicting offline changes.

The blog caters the information regarding the basic idea of PowerApps which is a tool for building the mobile apps. While creating the blog we have assumed that you have a good knowledge regarding the PowerApps so only the brief information is provided considering the same and implementation steps are mentioned right from the scratch.
With less time and low custom software development cost, PowerApps have the capability to transform your business. It extends or customizes the apps which are already being used. PowerApps acts as a service for using existing business applications that consumes data stored in a data source – may it be SharePoint, Office 365, Microsoft SQL Server, Twitter, Common Data Service, and Salesforce. At times, mobile devices loses connectivity or there is limited connectivity with the Internet and it can be extremely useful for users especially field workers or users that travel
regularly, to continue working. App users may need to process data even when there is no or very limited Internet connectivity. To cater to these needs, PowerApps is able to cache data locally on a device. One can use this feature to build offline apps.
However, building a completely offline app is a manual task and it brings very difficult challenges such as Synchronization of data and Conflicts resolution.
There are a few questions that arise in mind while developing a completely offline app using PowerApps:
- What if two users modify the same record during an offline session?
- Is it possible to merge changes from both the users together?
- How to cope up with a situation where an online user deletes a record that another user modifies while offline?
- How to add and modify records in offline mode?
You will find out answers to these questions in this series of blogs. PowerApps provides a set of features that help mobile-app developers create offline-oriented apps. You can:
- Launch apps in PowerApps when offline
- Run apps when there is no or very little Internet connectivity
- Use Connection signal object to determine whether an app is offline, online or in a metered connection state.
- Utilize Collections and use basic data storage functions such as LoadData and SaveData for offline connectivity.
Note: Offline capability feature is still under implementation and not valid for all the scenarios.
Building Offline Capable Apps
The first query while working with offline scenarios is how apps work with data. Apps in PowerApps commonly access data through a variety of connectors provided by platforms such as SharePoint, Office 365 and Common Data Service. Custom connectors can also be built that enables apps to utilize RESTful endpoint services, for example, a Web API or Azure Functions. Users must be online to consume data as all these connectors make use of HTTPS.

Handling offline data
Let’s observe what happens when a device becomes offline. The app will continue to be mostly functional in the case of running app that becomes offline between the running sessions. PowerApps provides a set of capabilities to browser, filter, search, aggregate, manipulate and sort data in a consistent way irrespective of the data source utilized. This allows SharePoint programmers to reconsider an app using a different backend, enabling use of the local collections with very little change in app’s logic.
The landing screen i.e. the browser screen continues to show data even when the app becomes offline, while also providing search and sort options on the screen. Display screen opens up an individual record while edit screen enables modification of data.
It is important to note that the refresh button on the browser screen and the save button on the edit screen will not work unless in an active Internet connection. Due to the lack of Internet connectivity, if PowerApps fails to carry out an action, it displays an error message.
![]()
When a user starts an app in PowerApps in offline mode, the user can only retrieve app which was previously running on the device in online mode. In the case, where app loads in offline mode for the first time, it won’t show any data. The best way to run an app in offline mode is to enable ‘airplane mode’ in a mobile device.
Note: This blog requires that you have the prior understanding of PowerApps concepts such as controls, screens, events, attributes, navigation etc. More information regarding PowerApps.
Techniques to Enable Offline Working
There are two vital features that help us create an app that works offline:
Connection Signal
- The Connection signal provides information regarding the network connection information/status of an app.
Signal Property Description Connection.Connected returns true when a device is connected to a network Connection.Metered returns true when a network connection is metered - The connection signal determines whether the active connection is metered or connected.
- The connection on mobile devices is generally a metered connection. It is useful to detect a metered connection because you can configure your app to consume less data in case of a device having a metered connection.
Saving and Loading Local Data
- SaveData and LoadData functions enable us to build offline apps by storing collections of data in a private area on the local device.
Function Description Syntax SaveData Saves local data from a collection into a file SaveData(LocalBooks, “OfflineBooksFile”) LocalBooks > target collectionOfflineBooksFile > file LoadData Retrieves local data. Stores and encrypts data in an area isolated from other users and apps.
LoadData(LocalBooks, “OfflineBooksFile”, true)LocalBooks > target collection for data OfflineBooksFile > file name from which retrieve data. True > specifies whether a function should continue to proceed without error
if the file doesn’t exist.
Using LoadData, we can only retrieve data that is saved via SaveData function from the same app. We cannot load data saved in other apps.
Note: To build an app having offline capability is a highly customized process. The main purpose of this blog is to provide an idea of the challenges that exist to build offline apps.
“Best Books” PowerApps app with Offline Capability
Let us consider a simple custom list “Best Books” in SharePoint Online to capture best books with “Book Name” (renamed Title column), “Author” (Single line of text) and Image (Hyperlink or Picture – Format URL as: Picture) as three fields. Our app logic relies on other two important fields – ID and Modified. We will use the auto-generated ID field to uniquely identify records and Modified Date Time field to check when the changes have occurred during offline connectivity. For keeping it simple, we will not introduce any lookup column inside our list.
Note: Here, we will use SharePoint Online as a data source for our app. You are free to use any other data source like CDS, SQL etc. Offline implementation logic remains the same.
Create new PowerApps from your SharePoint Online list
SharePoint modern list experience provides the ability to create PowerApps directly from the UI.
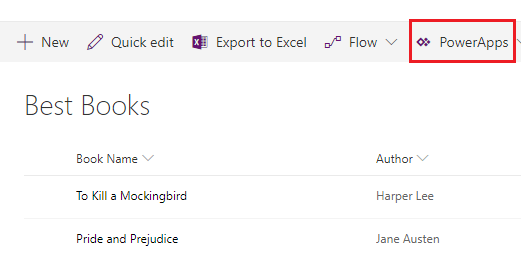
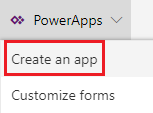
- Click PowerApps and then select Create an app
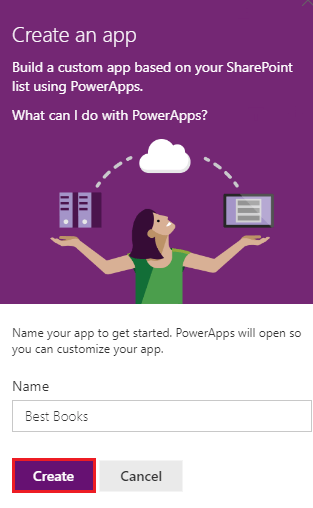
- Name your app “Best Books” in the PowerApps web designer in the right-hand pane and then click Create.
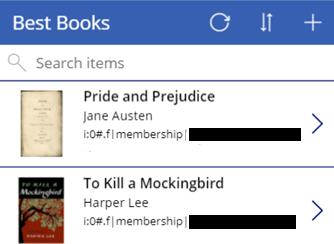
- Based on the list schema and data, PowerApps studio will automatically set up app screens for you. You can use PowerApps studio to customize your app to meet your functional requirements. The landing screen i.e. the browser screen will display all the items in the list.
- By default, “Attachments” field is visible on the browser screen. You can hide the field by selecting View -> Data Sources. It will open up data source from where the fields are populated.

- Select BrowserGallery1 from the left pane, expand Layout and change the Gallery Layout to “Image, title and subtitle”.
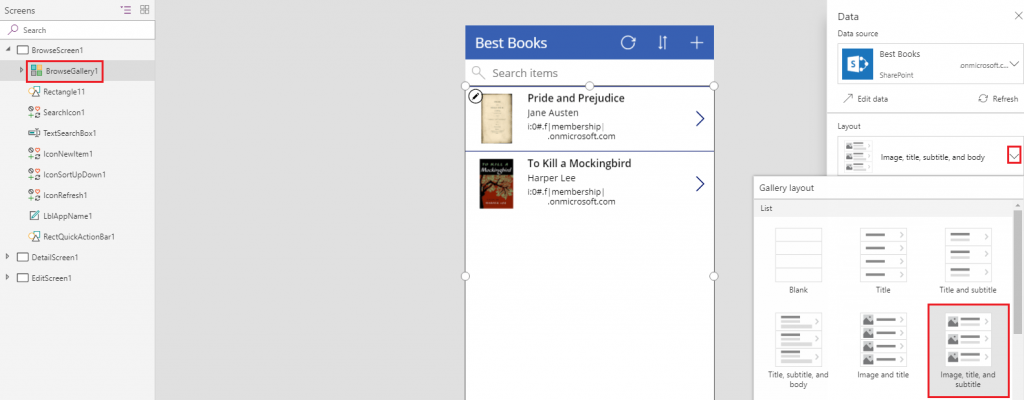
- App now displays only “Image”, “Book Name” and “Author”.

- Similarly you can hide “Attachments” from the edit screen too.
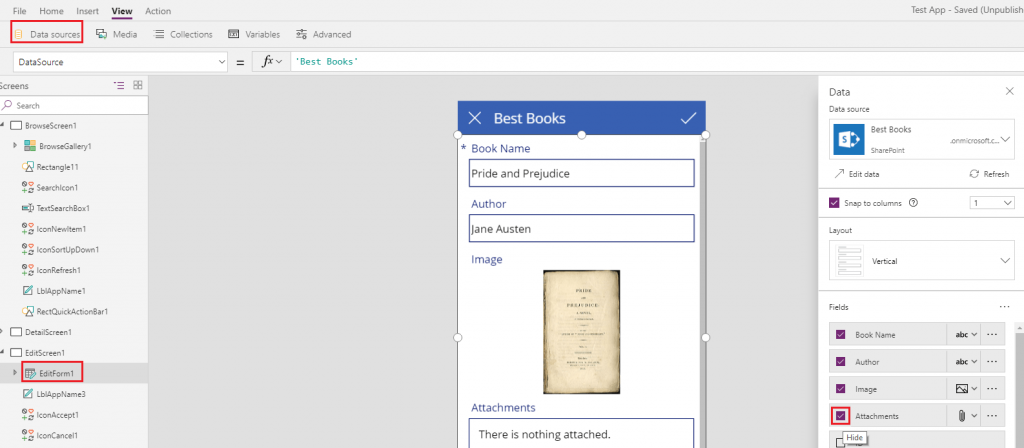
- Hide “Image” field from the edit screen, as the Picture column type is set read-only currently for PowerApps with SharePoint data source. Set Visible property “Off” for DataCard2.

Adapting an app working Offline
We have created an app that is based on a SharePoint list. The functionality will enable the users to view, add, update and delete items in offline mode. Keeping “Best Books” list entity in center, we will observe how offline capability will work with
SharePoint data source.
| Application start App copies SharePoint list “Best Books” into a local collection called BooksCollection | Best Books > BooksCollection |
| Working offline App stores offline changes in a local collection called BooksChanges | Offline changes > BooksChanges |
| Synchronizing changes App updates the item in SharePoint list and stores conflicting records in BooksChangesConflict collection |
BooksChanges > Best Books > BooksChangesConflict |
| Resolving Conflicts User can retain item in SharePoint or discard offline changes | BooksChangesConflict > Best Books OR > Discard |
Setting the Data Source to a Local Collection
When the app loads, we need to check if internet connection is available and also load the source data from SharePoint to the local collection. We will need to build offline cache of “Best Books” list. We will check whether connection is available through
PowerApps object called “Connection”. We need to add code to the OnStart rule of the browser screen. Below are the high level steps to accomplish this:
- Check if the internet connection is available when app is loaded.
- If the app is online, retrieve data from SharePoint list entity “Best Books” and put it in a local collection “BooksCollection”.
- Save the collected data to local storage (local cache) of your device, so that we can retrieve cached data in offline mode.
- If the internet connection is not available, retrieve saved data from local cache and populate collection from local cache.
- Utilize a new collection for later use to help synchronize records that have data modifications while in offline mode.
- Also, there will be a collection to store data conflicts.
Now, we are ready to show data in our app from the data source directly or the local storage based on internet connection availability.
Note: For now, you will receive error when you test app in browser and you can ignore that error. Please use mobile device to test LoadData and SaveData. Assumption is that you have started app at least once in online mode before you
test offline functionality.
Reconfigure Screens to use Local Collection
The next step is to rename all references of “Best Books” data source to BooksCollection. We will need to reconfigure all the screens inside the app to use BooksCollection local collection.
- Browse Screen1 > Browse Gallery1 > Items (Only show the “Title” and “Author” fields in the gallery, along with sorting and searching capability)
- DetailScreen1 > DetailForm1 > DataSource
- EditScreen1 > EditForm1 > DataSource
Refreshing the data
We need to update Refresh icon on the browser screen to save data to BooksCollection file after refresh occurs. We need to add code to the OnSelect rule of Refresh icon on the browser screen.
![]()
Building a Synchronization screen to handle Syncing of Data
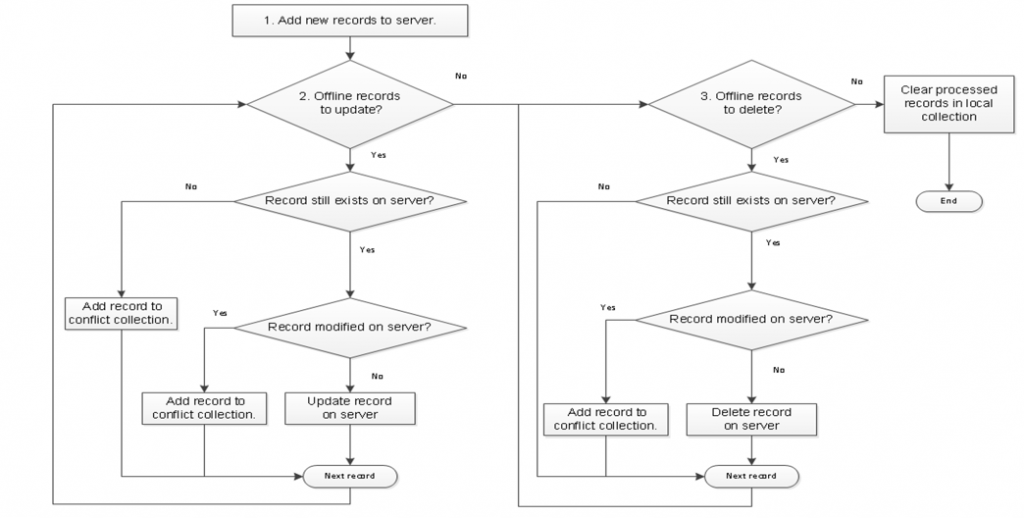
The next step is to build a synchronization screen to review and sync updated data. The screen displays a sync button which detects if the device is online and syncs data. Below is a flowchart of the synchronization process.
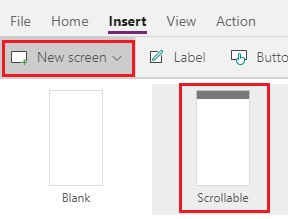
- Add a new screen of type Scrollable to build synchronization feature.
- Right click and delete inbuilt Canvas
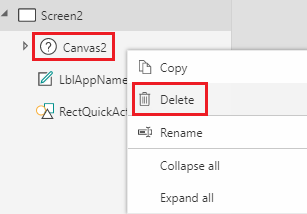
- Rename synchronization screen to SyncScreen. Right click newly created screen and select Rename.

- Change the label text at the top to “Sync Offline Changes”.

- Add a Gallery control of Vertical type and reset its positioning. To know more about Gallery Control.

Note: We will need to add two buttons at the bottom. So, keep appropriate space below the Gallery Control.
- Set the Items property of the newly added Gallery control to BooksChanges collection.
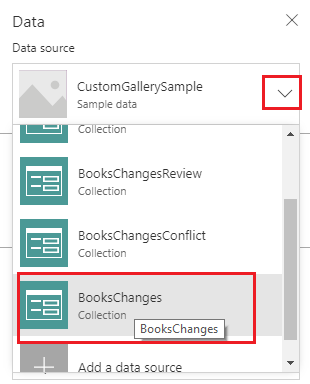
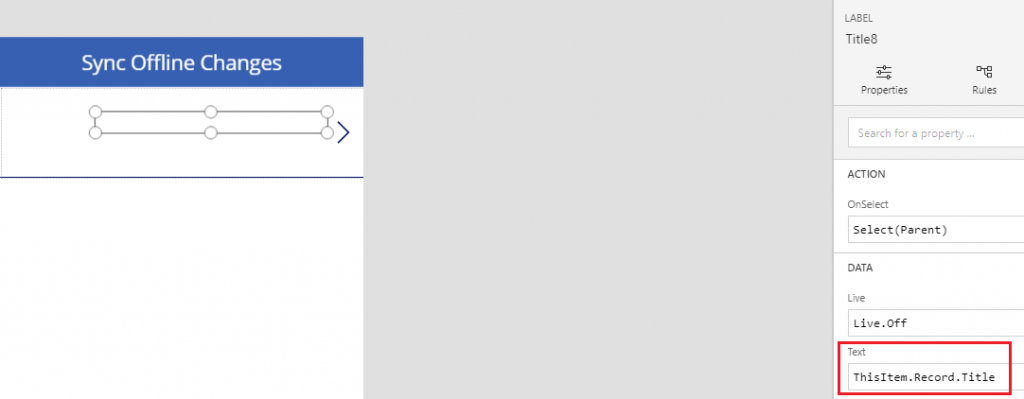
- We can use ThisItem.Record.<Fieldname> syntax to display a record from offline mode. Below is the image of Image property which is set for “ThisItem.Record.Image”

Similarly, you can set properties for Book Name and Author as “ThisItem.Record.Title” and “ThisItem.Record.Author0” respectively.
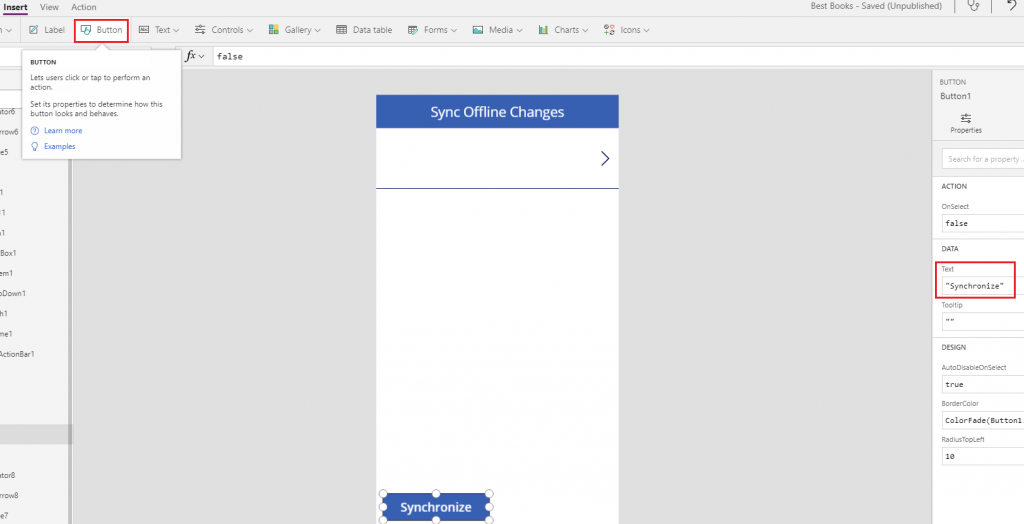
- Add a button below the gallery inside the synchronization screen to sync data from offline mode and rename the button text as “Synchronize”. Adjust the width and height of the button as needed.
- We will need to add code on OnSelect property of the button for new records created offline and code to synchronize updated and deleted records. The code will carry out the process as described earlier in the flowchart.
Below are the high-level steps to accomplish this: The code works by processing offline record modifications from “BooksChanges” collection. Once all the data is processed, “BooksChanges” collection will be empty.
- Save added records from “BooksChanges” collection inside “Best Books” list.
- Refresh “Best Books” list
- For the item modified offline, retrieve a current record from “BooksChanges” collection and save it inside “BooksChangesReview”
- If source record is not found in “BooksChangesReview” collection, add the record to “BooksChangesConflict” collection
- Load and process records from “BooksChangesReview” collection which are not modified
- After these remaining items in “BooksChangesReview” are conflicting records. Add those records inside “BooksChangesConflict” collection.
- Retrieve offline deleted records and load into “BooksChangesReview” collection
- Delete records from “BooksChangesReview” collection which are removed from the server
- Remove the records from “Best Books” list which are deleted in offline mode.
- After this remaining records in “BooksChangesReview” are conflicting. Add those records inside “BooksChangesConflict” collection.
- Update local cache file to include changes
- Alert the user in case of conflicting records.
The code depends on the offline data modifications from the BooksCollection collection and once all the records are done, the collection will be empty.
- We can enable users to navigate to the conflict resolution screen by providing a “Conflicts” button on the synchronization screen.
- Add code on DisplayMode action to disable conflicts button in case of no conflicting records.
- Also, add code on OnSelect action of conflicts button to navigate to the conflict resolution screen.
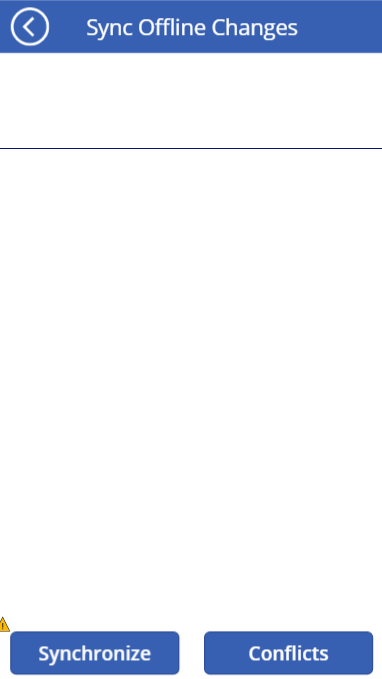
- Disable “Next” arrow from the gallery as it is not required. Instead, add a “Back” button at the top on sync screen.
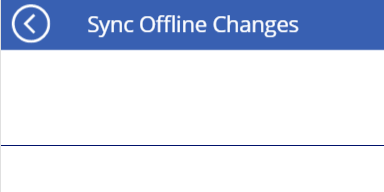
- Add code on OnSelect property of Back button on synchronization screen to navigate back to the browser screen.
- In order to navigate to the synchronization screen, add an icon on the browser screen.Open File menu and on the Content tab, choose Media and upload the required image.
 Press Esc to return to the workspace.Select Image under Media in the Insert tab
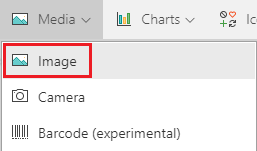 Provide its Image property with the name of the file you uploaded, adjust the size of the image as needed to place it on the left of Refresh icon and rename it to “SyncIcon”. Provide its tooltip as “Sync Offline data”.
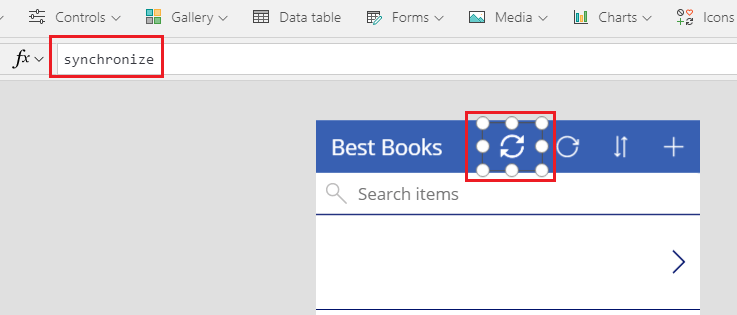
- Set the OnSelect property of newly added sync icon on browser screen to navigate to sync screen.
Disabling Icons and Buttons
We can disable a control inside an app using DisplayMode property. The property has one of the three values: Disabled, Edit or View. When the device is offline, we need to disable synchronization button on the sync screen.
Conclusion
We saw how to enable offline capabilities in PowerApps with SharePoint development. By default, the app in offline mode shows no data as it does not retain data for future offline sessions and it will throw an unexpected error. To cater to these needs, we discussed two features. First, PowerApps can store and load data from local cache files. Secondly, it provides an ability to SharePoint developers to check whether the connection is available and also if the connection is a metered one.
In the next blog of the series, we have provided an overview of handling offline add, update and delete a record as well as handling data conflicts.
From the title of the blog, the first question comes in mind is “What is PowerShell?”
The answer is: It is an object-oriented automation engine and scripting language developed by Microsoft and built on the .Net framework. It has an interactive command-line shell where the user can execute commands to fulfill their tasks.
It’s mainly used in configuring systems and automate administrative tasks. Actually, PowerShell and PnP-PowerShell scripts are highly used by SharePoint administrators and SharePoint developers can run large and bulk operations on sites. For example, add large data in SharePoint lists, apply permissions to users in sites, etc. Below scenario is often concluded while SharePoint consulting.

Scenario
For on-premise servers: Sometimes client provides SharePoint administrator access of site but without remote desktop access connectivity so we cannot take RDP session to run PowerShell scripts for managing SharePoint sites. In this case, we can log in to one of the client’s machines which are connected to SharePoint farm domain and after that, we can run PnP-PowerShell cmdlets for SharePoint site management which is not possible with conventional PowerShell scripts.
PowerShell scripts are based on the .Net framework so for execution, they are highly dependable on Microsoft OS versions where PnP-PowerShell is platform independent which means the user can run cmdlets from their Mac or Linux machines to manage SharePoint sites.
SharePoint administrators majorly use PowerShell scripting to manage SharePoint servers. Authorized administrators can perform a wide variety of operations in SharePoint On-premise and SharePoint Online by executing cmdlets (pronounced “command-lets”).
Microsoft provides cmdlets for these 2 systems:
- List of cmdlets for SharePoint On-premise server: SharePoint Server PowerShell
- List of cmdlets for SharePoint Online: SharePoint Online PowerShell
The SharePoint Development Community
Commonly known as “SharePoint PnP Community” (PnP stands for Patterns and Practices) which is an open source initiative coordinated by the SharePoint engineering team. This community controls documentation, reusable controls and samples related to SharePoint development. Enthusiast developers or users can contribute their efforts in this community via GitHub. It is community driven open source project where Microsoft and external members can share their learning and implementation practices for Office, Office 365 and SharePoint servers. It was first started with guidance in the SharePoint add-in model and then evolves with other areas like SharePoint framework, Microsoft graph API, Office add-ins and Office 365 APIs.
Let’s talk about PowerShell commands prepared by the PnP community commonly known as PnP-PowerShell.
PnP-PowerShell
Microsoft has already provided a library of PowerShell commands for SharePoint On-premise servers and SharePoint Online along with separate command-line Shell. The question appears in mind that “What is PnP-PowerShell and what is the use of it?”
SharePoint Patterns and Practices contains a library of PowerShell commands to ease the life of SharePoint administrators who can perform complex tasks in minutes with the new PnP PowerShell commands. These commands use CSOM and work for both SharePoint Online and SharePoint On-premise servers.
Most amazing and facilitating feature of PnP-PowerShell is cross-platform execution. PowerShell cmdlets used for SharePoint before were Microsoft OS dependent but now, you can use PnP-PowerShell with different platforms like Mac and Linux.
One of the benefits behind CSOM commands for SharePoint On-premise servers is that an administrator can use cmdlets without logged-in to servers which means the administrator can access servers from any machine’s PowerShell command prompt which is connected with same domain in the same farm.
PnP-PowerShell provides something we can call “Context Switching”. For example, you are connected to the SharePoint Online site. Now you want to do some admin side operations. With old SharePoint Online cmdlets, you need to first close the connection for the current site and after that, you need to create the context to connect to admin site using different URL (i.e.: https://admin.sharepoint.com). With PnP-PowerShell cmdlets, you can easily connect to admin site without creating the new context or closing older context.
PnP-PowerShell cmdlets:
Connect-PnPOnline https://contoso.sharepoint.com Get-PnPLis Get-PnPTenantSite |
Using the 1st line, you are connected to the SharePoint Online site. In 2nd line, you get all lists from the site. And using the 3rd line, you are now connected to SharePoint admin site. It creates a clone of context during execution of the 3rd line, to use further in operations. So there is no need do new connection for admin site using commands.
Let’s start installation without wasting much time.
Installation
Prerequisites
- If you are using Windows Server 2012 R2 OS. Normally, this OS has PowerShell version 4. You require to upgrade PowerShell to version 5. Kindly download setup file from below URL to upgrade PowerShell: https://www.microsoft.com/en-us/download/details.aspx?id=54616
- You need to be a local administrator to run PowerShell as an administrator.
- Set execution policy to allow to run remote scripts.
Steps:
- Run
get-executionpolicyPowerShell command to get status of execution policy as shown below:
- If it’s not set to “Remote signed”. Then set it by this command:
set-executionpolicy remotesigned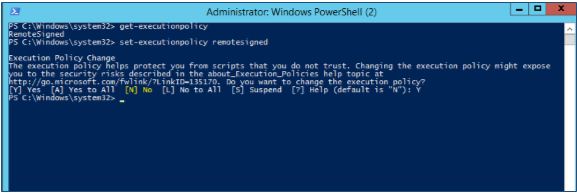
- Need appropriate permissions in SharePoint Online or in SharePoint server.
Note: After performing the required operations through PnP cmdlets, set the execution policy from “Remote signed” to the original one i.e. the output of the get-executionpolicy cmdlets.
Install Setup
First approach: PowerShell Gallery
If your main OS is Windows 10, or if you have PowerShellGet installed, you can run the following commands to install package according to your environment need:
| SharePoint Version | Command to install |
|---|---|
| SharePoint Online | Install-Module SharePointPnPPowerShellOnline |
| SharePoint 2016 | Install-Module SharePointPnPPowerShell2016 |
| SharePoint 2013 | Install-Module SharePointPnPPowerShell2013 |
Here are some warnings or error messages with workarounds you might face during installation:
- Sometimes for On-premise servers, if it gives below warning:Warning: user declined to install untrusted module SharePoint PNP PowerShellUse “-Force” attribute after the command:e.g.:
Install-Module SharePointPnPPowerShell2013 –Force - Error message: PackageManagement\Install-Package: The version ‘x.x.x.x’ of the module ‘SharePointPnPPowerShellOnline’ being installed is not catalog signed. Use below cmdlet:e.g.:
Install-Module SharePointPnPPowerShellOnline -SkipPublisherCheck -AllowClobber
Second approach: Setup files
Download setup files from releases. It will provide different setup file for SharePoint 2013, 2016 and SharePoint Online. Install it according to your server needs. After installation, you need to restart the open instance of PowerShell.
Third approach: Installation script
It will require at least PowerShell v3 installed in the machine. You can check the version of PowerShell by running $PSVersionTable.PSVersion.
To install the cmdlets you need to run below command, which will install PowerShell Package Management and modules from PowerShell Gallery.
Invoke-Expression (New-ObjectNet.WebClient).DownloadString('https://raw.githubusercontent.com/sharepoint/PnP-PowerShell/master/Samples/Modules.Install/Install-SharePointPnPPowerShell.ps1') |
Install Updates
Every month a release will be available for cmdlets. You can install the latest updated version using below commands:
Update-Module SharePointPnPPowerShell*
You can check installed PnP-PowerShell versions with the following command:
Get-Module SharePointPnPPowerShell* -ListAvailable | Select-Object Name,Version | Sort-Object Version –Descending |
Output:

Getting Started
Connect to SharePoint Online site with PnP-PowerShell
- Let’s connect to SharePoint Online Site with below command:
Connect-PnPOnline –Url https://<tenant_name>.sharepoint.com –Credentials (Get-Credential)
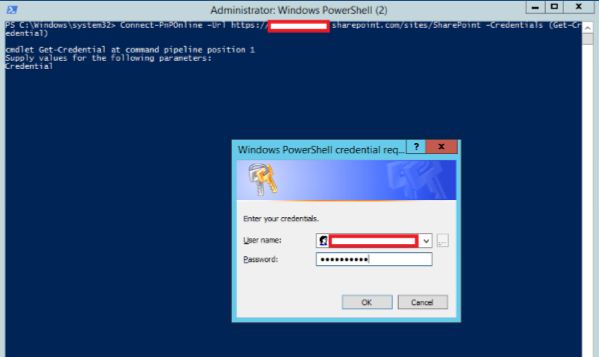
Note: If you are using multi-factor authentication on your tenant, use below command:
Connect-PnPOnline -Url https://<tenant_name>.sharepoint.com -UseWebLogin
- You can see all cmdlets provided by PnP with below command:
Get-Command -Module *PnPPowerShellOnline*
Output:
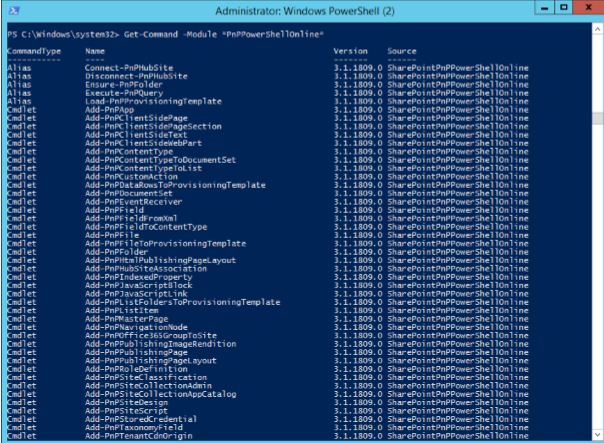
In 3.1.1809.0 version, there are 348 commands available to manage SharePoint Online.Create one custom list and perform CRUD operations
- Connect to site using above commands.Create custom list
- Using below command, get all lists from SharePoint site.
Get-PnPListOutput:
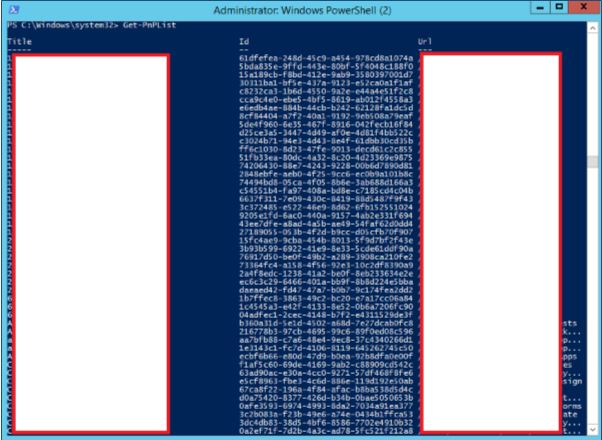
- Create new list with below command:
$listName="NewPnPList" New-PnPList -Title $listName -Url "NewPnPList" -Template GenericList -EnableVersioning

Create fields in new list
- Using below commands, 2 fields will be created in list:
$listName="NewPnPList"
Add-PnPField -List $listName -DisplayName NameHF -InternalName NameHF -Type Text -AddToDefaultView
$choices="Sofware Developer","Sofware Tester","Release Manager"
Add-PnPField -List $listName -DisplayName RoleHF -InternalName RoleHF -Type Choice -Choices $choices -AddToDefaultView
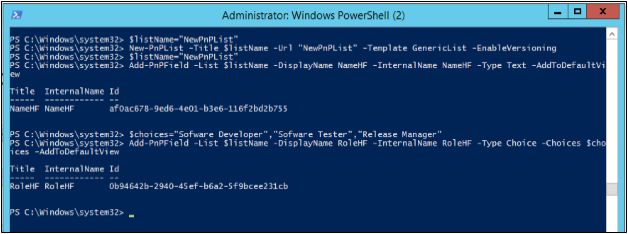
Output:
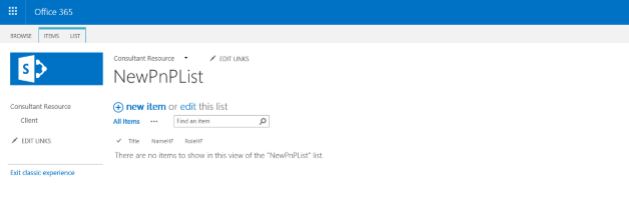
Create new item in list
- Create new item using below command:
Add-PnPListItem -List "NewPnPList" -Values @{"Title" = "Test 1"; "NameHF"="Name 1"; "RoleHF"="Software Developer"}

Output:
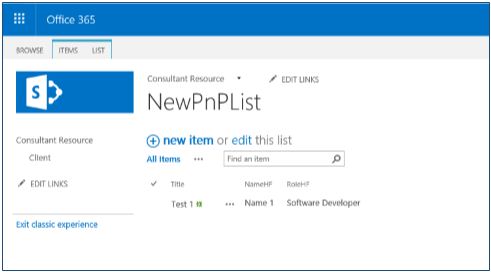
Update existing item
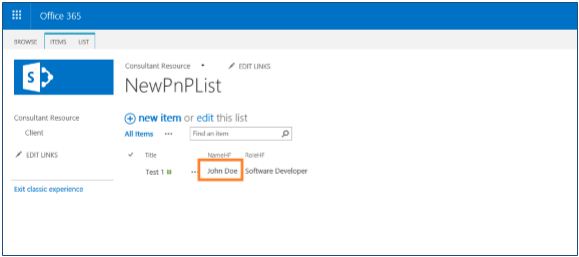
- Update title of existing item using below command. Here, ID of list item is used for identity.
Set-PnPListItem -List "NewPnPList" -Identity 1 -Values @{"NameHF" = "John Doe"}
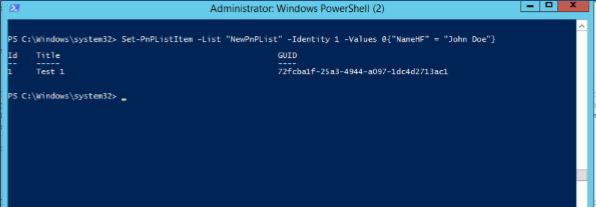
Output:
Delete existing item
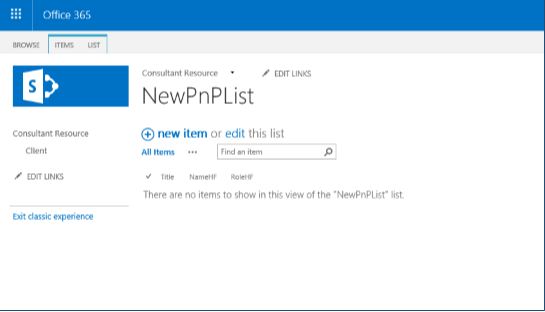
- Delete list item using below command. Here, ID of list item is used for identity.
Remove-PnPListItem -List "NewPnPList" -Identity 1
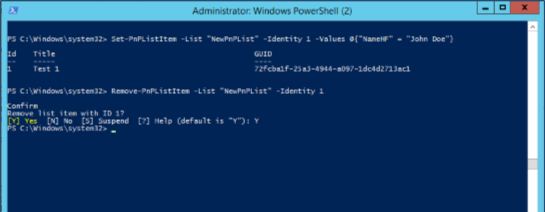
Output:

Most of the time users need to wait for some time while accessing a particular website. Due to this reason they often leave a particular site without even completing a particular task.
Don’t examine the “patience” of your targeted audience while trying to access the content of your particular website. But, examine to present them a seamless ride through the entire process by executing these site optimization tips on your Magento development.
Here are some points which provide instructions for optimizing the performance of your website. Some are very basic steps/configurations changes only which will improve performance on the go.
Steps to Optimize performance in Magento 2 Development
1. Enable Flat Catalogue Categories and Products
There are 2 data models in Magento: EAV (Entity Attribute Value – default) and flat. EAV is a kind of an agile model. It allows the user to add custom attributes as many as likes, but the problem with EAV is that it stores the data in many tables and in order to perceive the information your query will have various JOINs which is a bad performance.
The flat model takes the attributes you have created with a system created attributes and creates a multicolumn table on the fly. So in order to comprehend the data, you will have to make just 1 simple SELECT query to db.
In flat mode, you can change or add attributes but need to re-index which will be manually or will be automatically, depends on your configuration, and it will create flat table again.
In EAV data model data is fully in normalized mode, each column data value is stored in their respective data type table. For example
product ID is stored in catalog_product_entity_int table
product name in catalog_product_entity_varchar table
Flat data model use one table, so it’s not normalized and uses more database space.
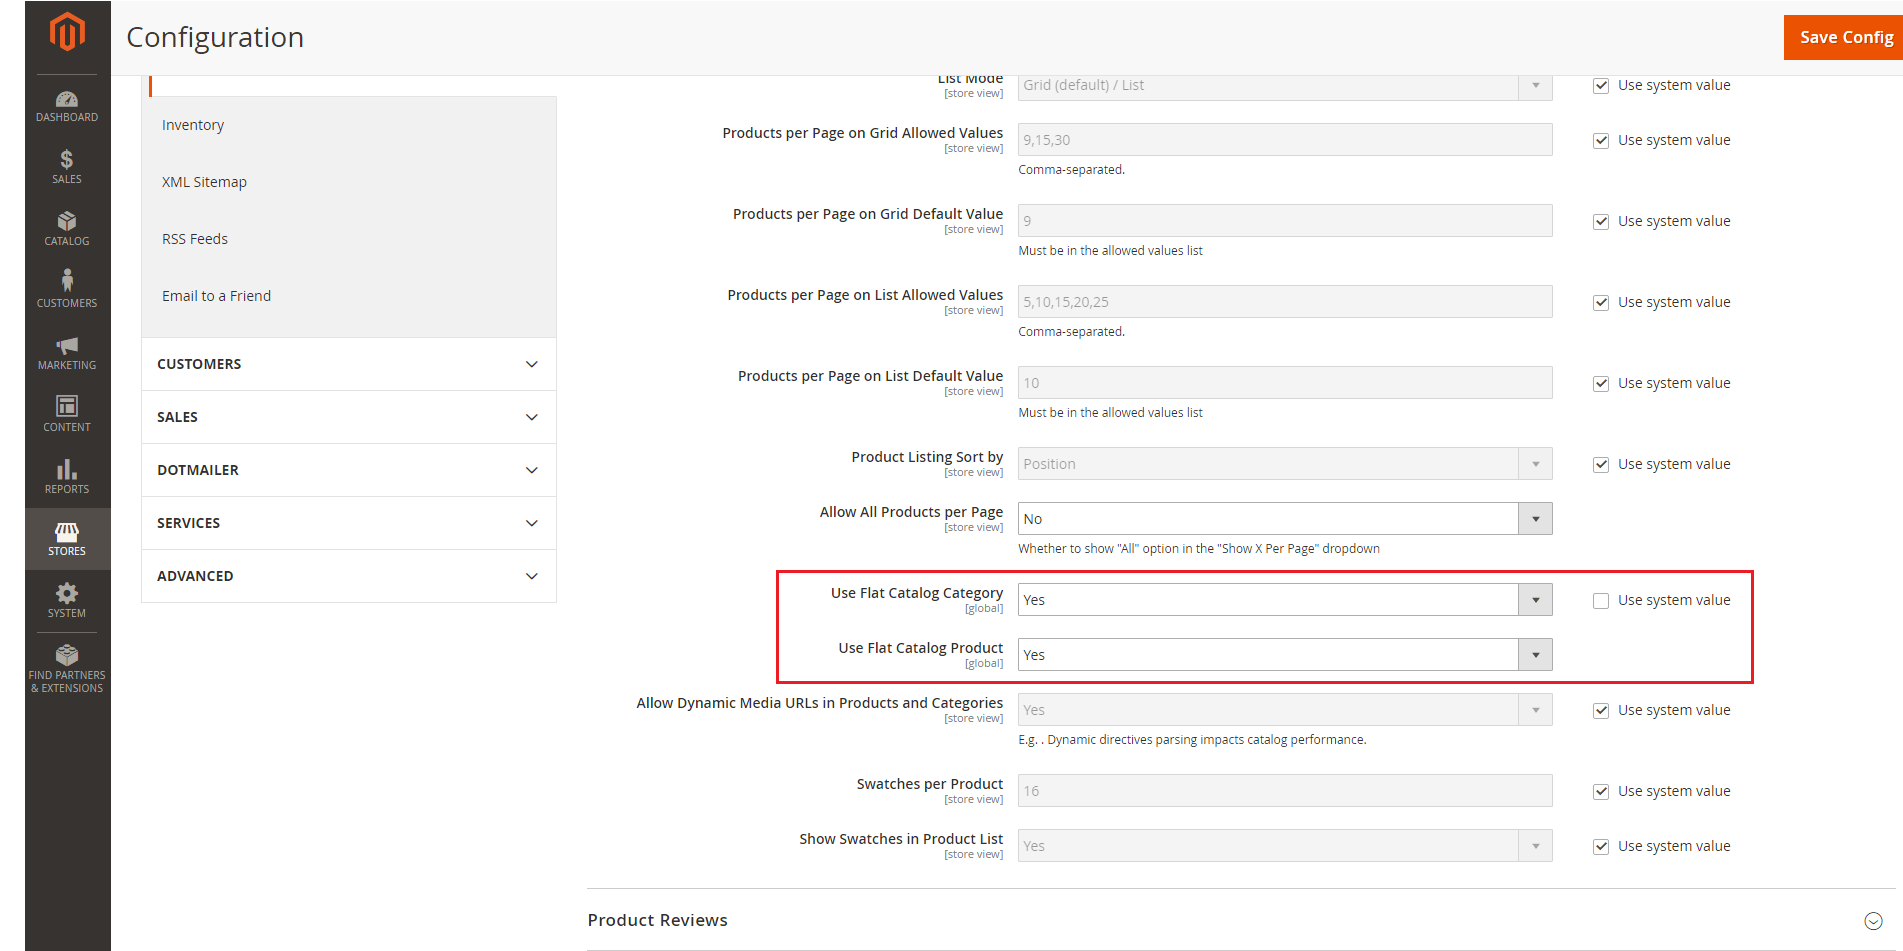
To enable flat catalog categories and products goto Admin Panel > Store > Configuration > Catalog > Catalog > Storefront and set ‘Use Flat Catalog Category‘ and ‘Use Flat Catalog Product ‘ value yes.
2. Merge CSS and JS Files
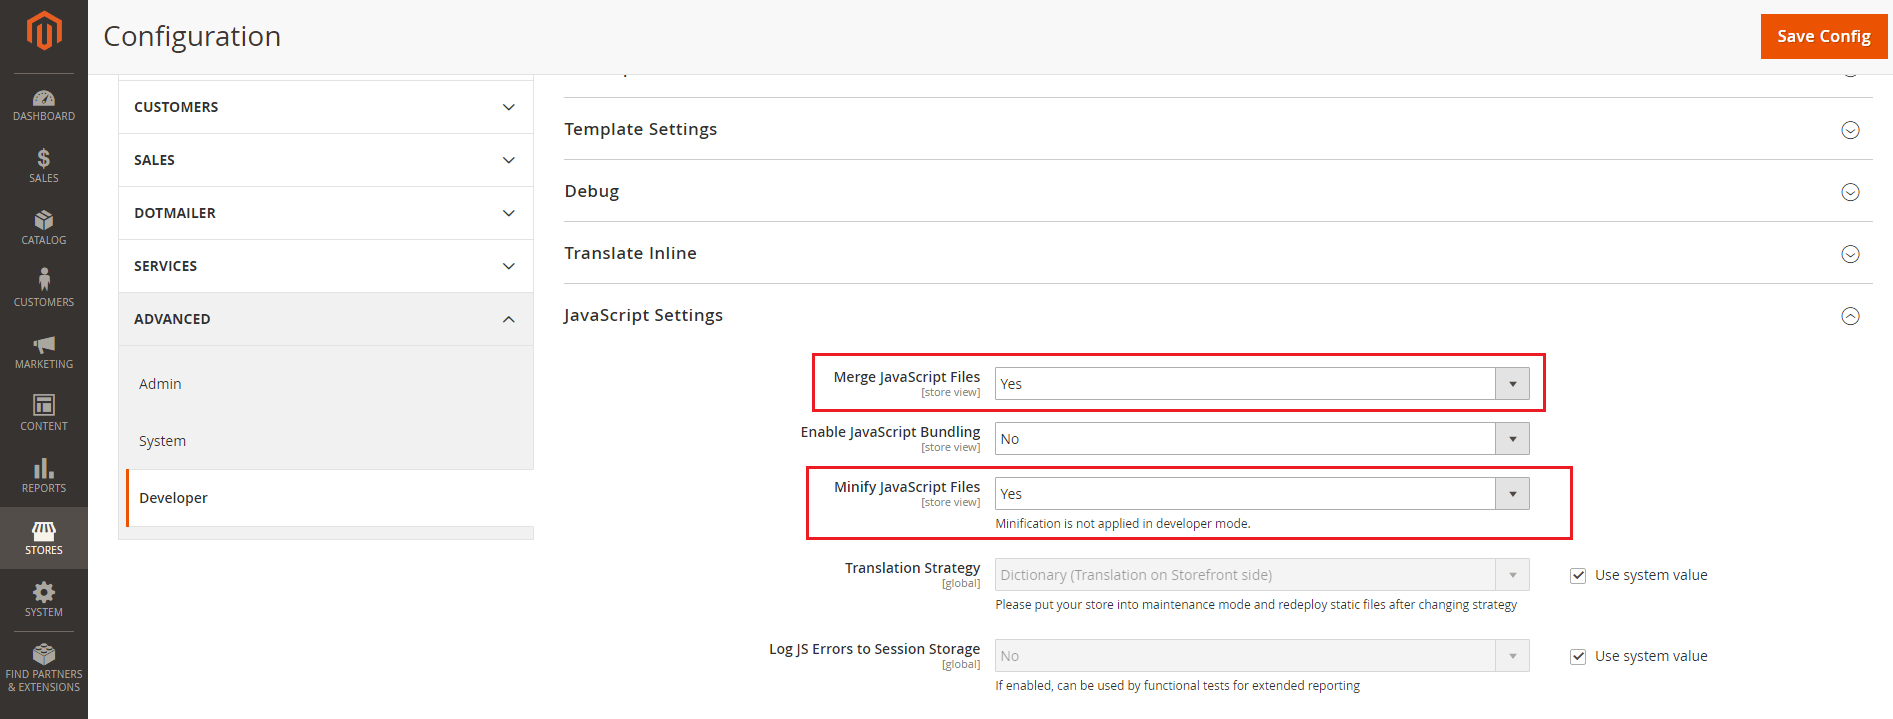
To merge and minify JS file goto Admin Panel > Store > Configuration > Advance > Developer > JavaScript Settings. Minification is not applicable in developer mode.
To merge and minify CSS file goto Admin Panel > Store > Configuration > Advance > Developer > CSS Settings. Minification is not applicable in developer mode.
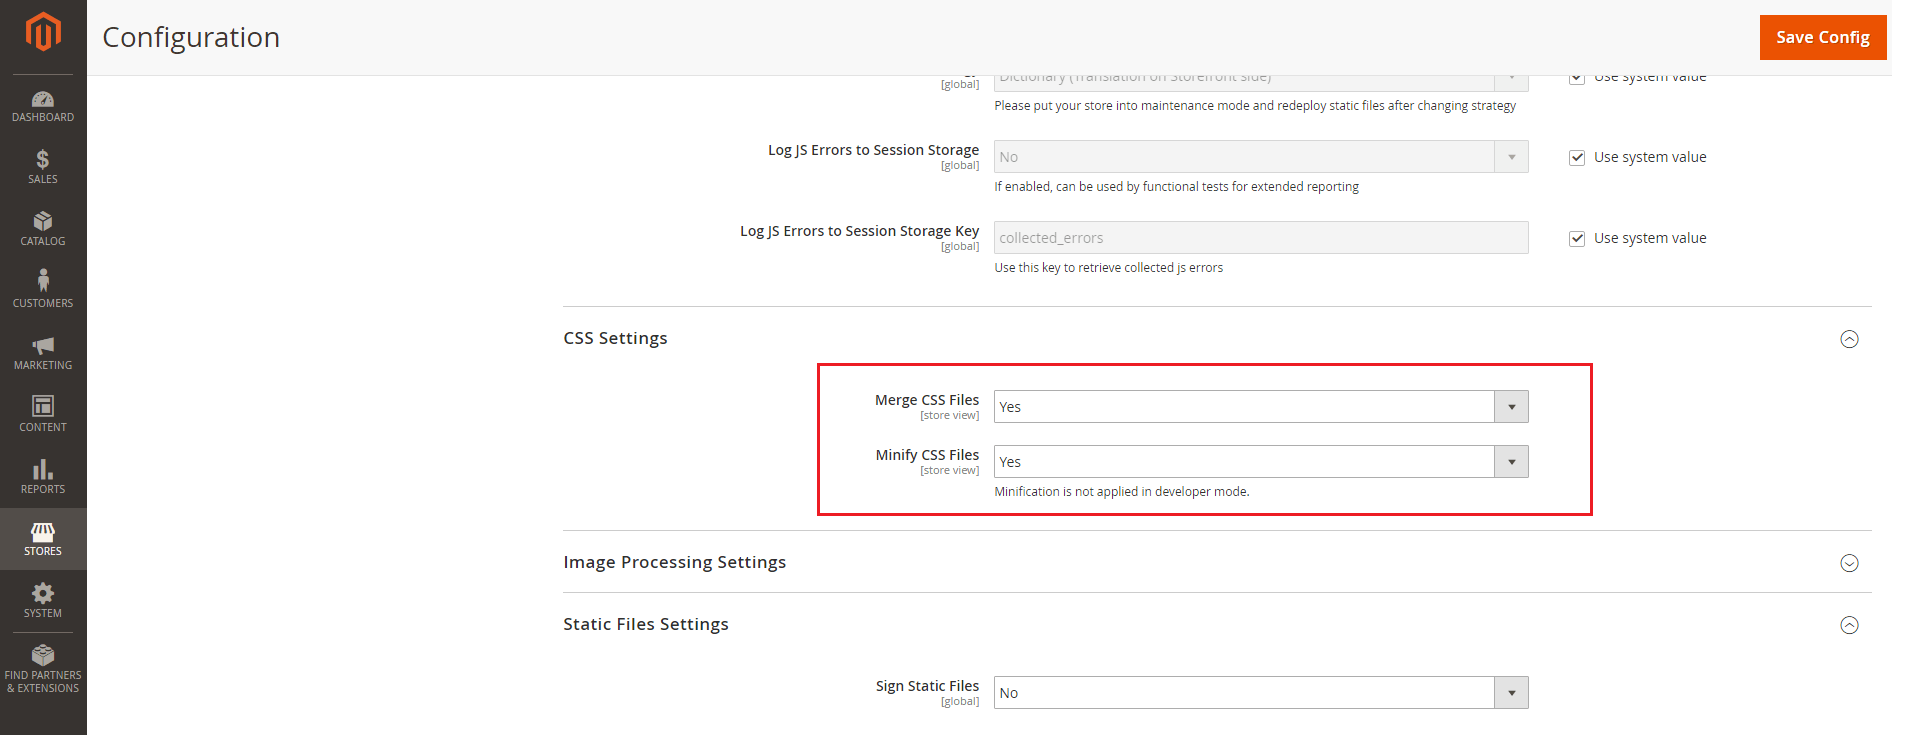
When complete, Save Config and execute below command in command line to activate the change.
php bin/magento cache:clean
3. Content Delivery Network (CDN)
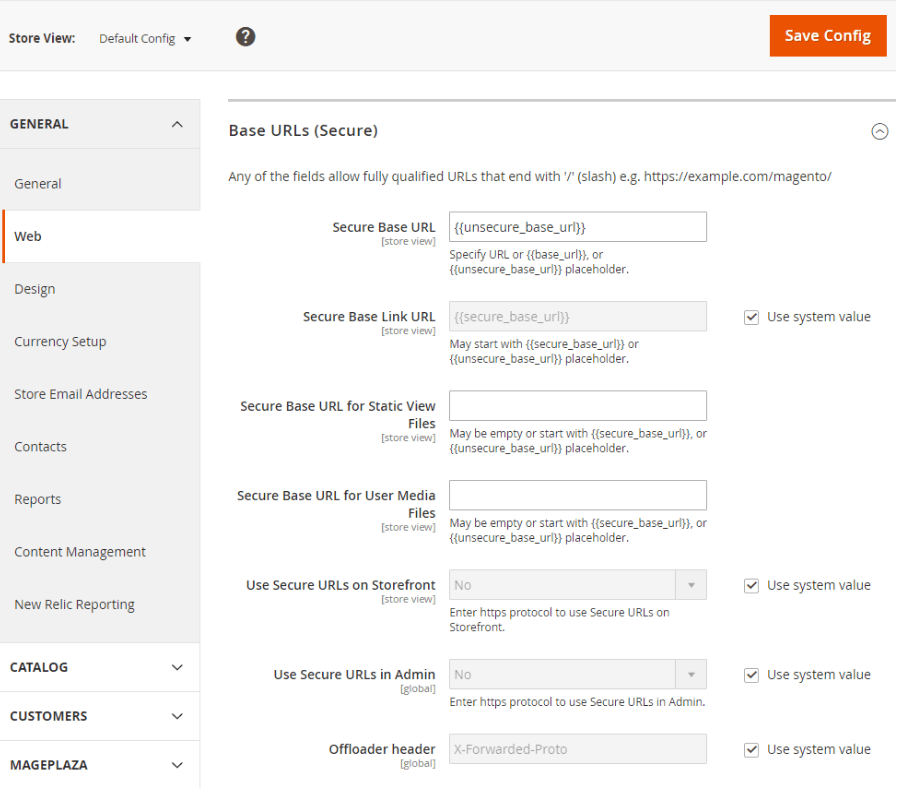
To setup content delivery network for Magento 2 stores goto Admin Panel > Stores > Configuration > General > Web > Base URLs (Secure)
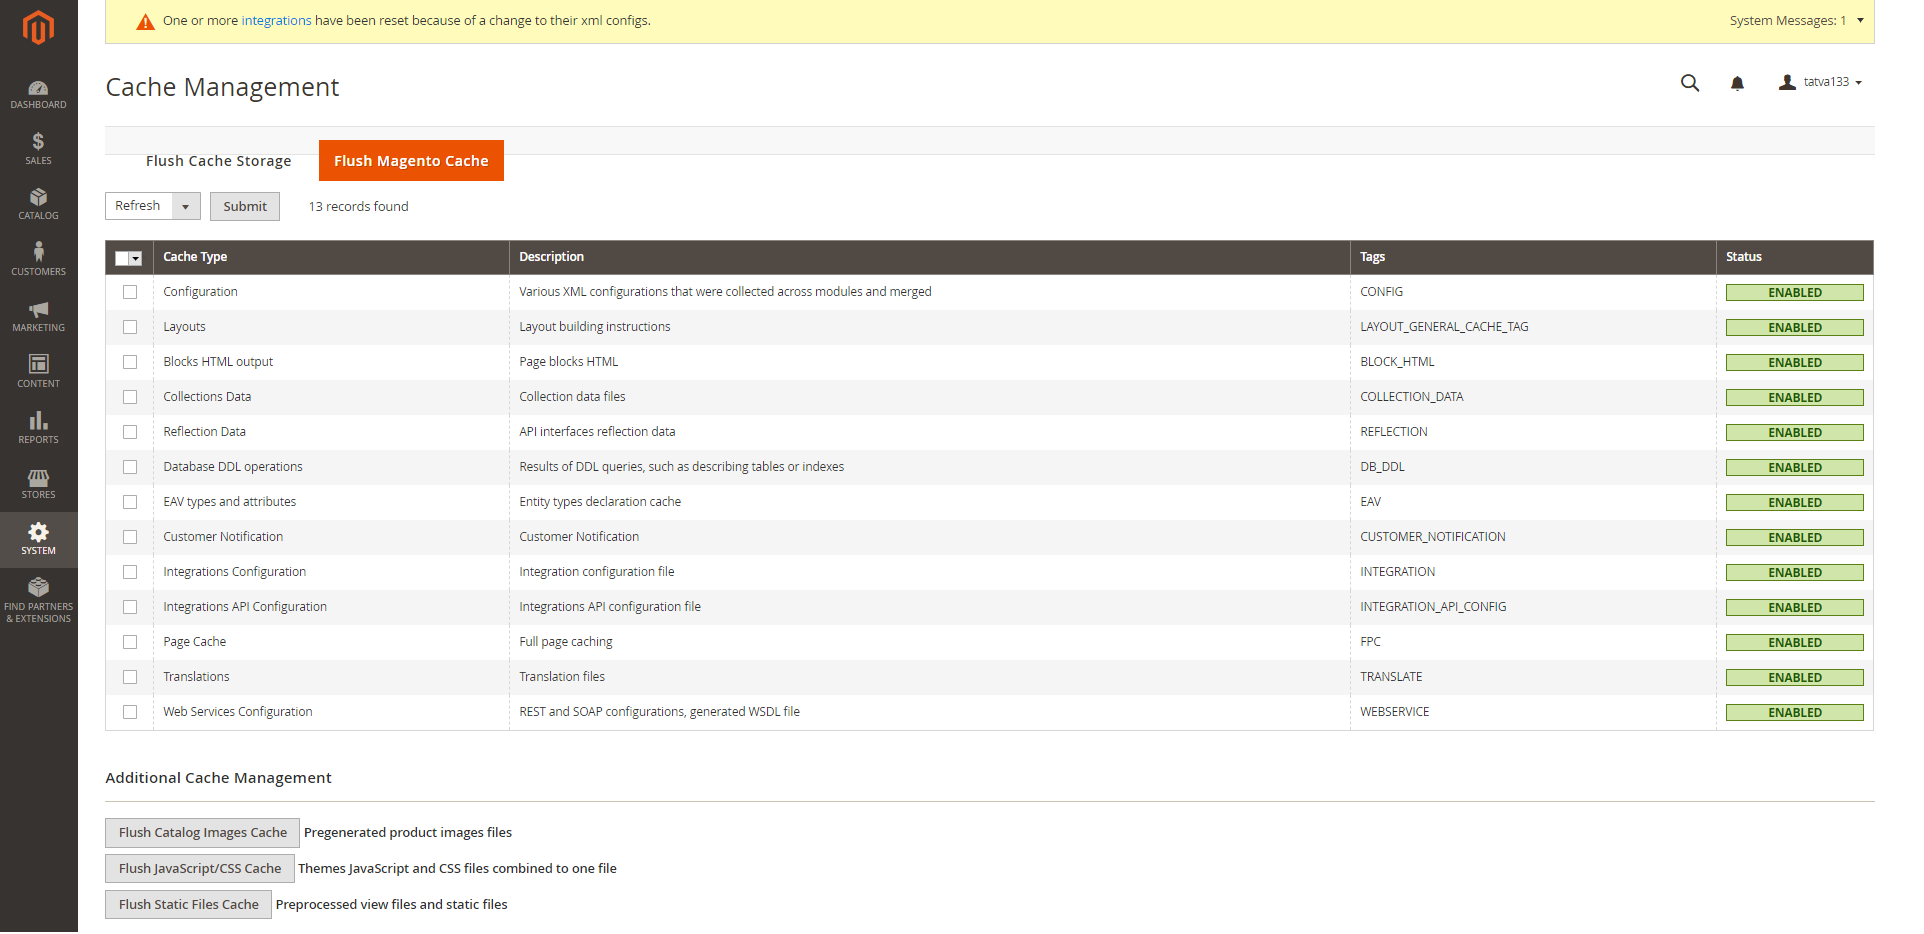
4. Cache Management
To manage cache goto Admin Panel > System > Cache Management
5. Image Optimization
Image size is important factor to improve performance of Magento 2 website. The image size is too heavy to upload on your site is one of the reason for the overload page. Hence compression image should be done before submitting any image.
6. Enable Compression
Follow the resources to facilitate compression by Google’s offer. Let’s change nginx compression directives from:
- gzip_types: text/plain application/x-javascript text/javascript text/xml text/css image/x-icon image/bmp image/png image/gif; to
- gzip_types: *;
7. Reduce Server Response Time
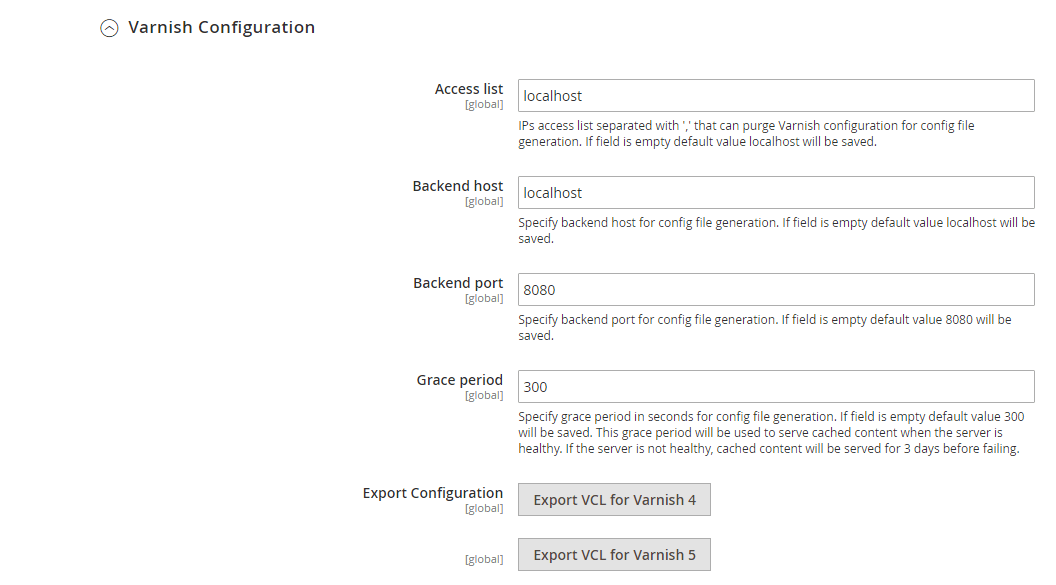
Magento 2 supports full page cache via varnish natively. Let’s setup varnish to get the first byte around 0.1-0.2s. To setup varnish goto Admin Panel > Store > Configuration > Advance > System > Full Page Cache.

Open Varnish Configuration section, complete the settings:
8. Magento Updates
Remember to update Magento 2 that will try the best to help you optimize the site performance.
9. Production Mode
Make sure, website runs on “production” mode while putting it on live environment. Developer mode will have a major impact on performance. Production mode enhances storefront responsiveness and blocks long initial page load times that can happen in default mode.
10. Enable Magento Default Profiling
If after doing all basic things, you still can find that your website is slow then you can enable Magento default profiling and find the culprit and take necessary coding level changes.
11. Server/Software’s can be used
Following software or servers can be used which will or help to boost the performance of any Magento web development services.
- Varnish Cache
- Redis
- PHP 7
- Solr
- Ngnix
- PHP
- FPM
- New Relic
- APC Cache
12. Third party plugins
Make sure that any unused / unwanted third party plugins are disabled / removed.
13. SSD Hardisk
As Magento provide default cashing as files, it is always an advantage to use SSD harddisk
14. Mysql Tuning
The following are some of the settings that we can adjust for better performance:
- Slow Query Log
- Max Connections
- Worker Threads
- Memory Usage
- Key Buffer
- Query Cache
- Sort Buffer
- Joins
- Temp Tables
- Table (Open & Definition) Cache
- Table Scans (read buffer)
- Table Locking
- Innodb Status
15. Enabling and tuning PHP opcache
It is recommended to enable and tune PHP opcache for maximum performance.
- opcache.enable_cli=1
- opcache.memory_consumption=512
- opcache.max_accelerated_files=100000
- opcache.validate_timestamps=0
- opcache.consistency_checks=0

The scenario to deal with creating files in document libraries, adding/updating/deleting items in the SharePoint list, at times requirement emerges to perform some action on such events like sending notification, data manipulation on SharePoint lists or libraries, etc.
In SharePoint Development, there are two manners to achieve this – SharePoint Designer Workflow and Event Receivers. Of course we can use these techniques to achieve such requirement, but it runs on SharePoint server, i.e. business logic runs on the same server where SharePoint is installed, and event receivers do not support while working with Office 365 – SharePoint online. Few SharePoint programmers while consulting process may pitch to use different approaches like provider hosted-apps.
Cases where the business requirements are to keep business logic and SharePoint server segregated. Fortunately to deal with document libraries/lists on a host web (on which site we install application), it provides concept called Remote Event Receiver.If any list item is added/edited/deleted, and we want to perform any action like sending notification, we can use a remote event receiver.
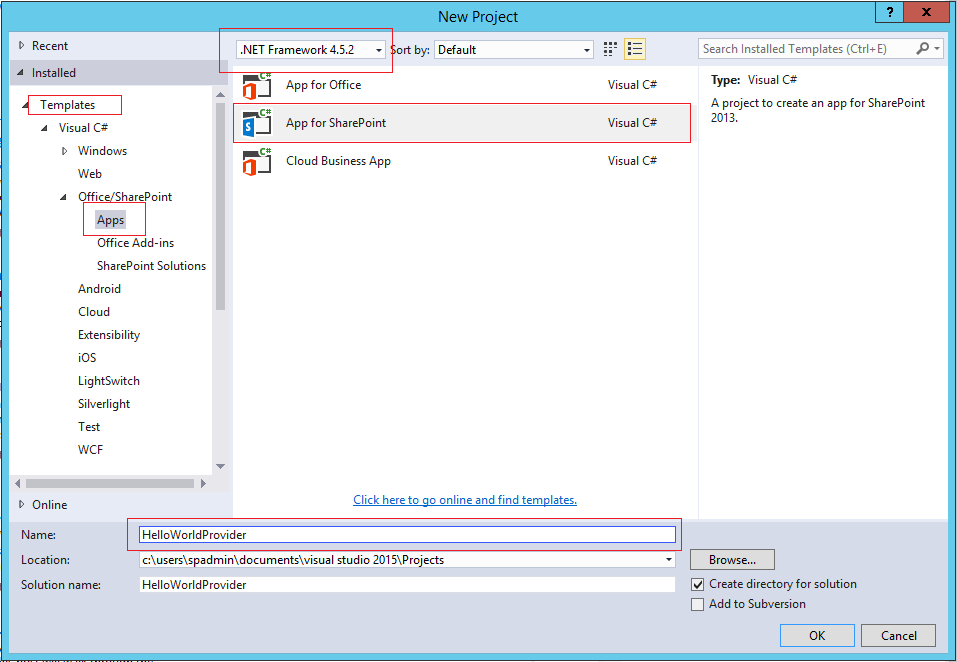
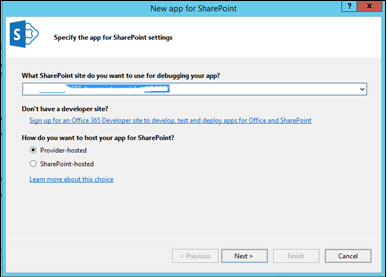
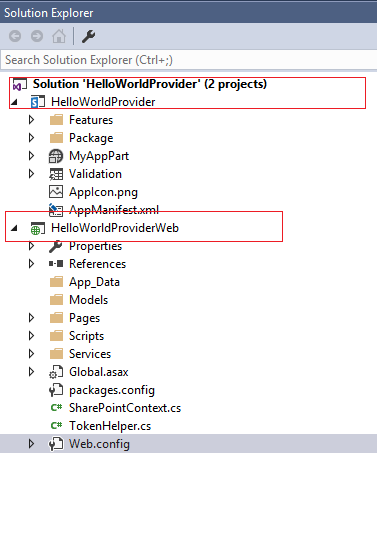
So, let’s learn how to prepare provider hosted app and remote event receiver. We will host Provider Hosted application in Azure. Below are mentioned the steps to create remote event receiver.
Following are the tools to create remote Event Receiver:
Step 1 – To Create Provider Hosted Application
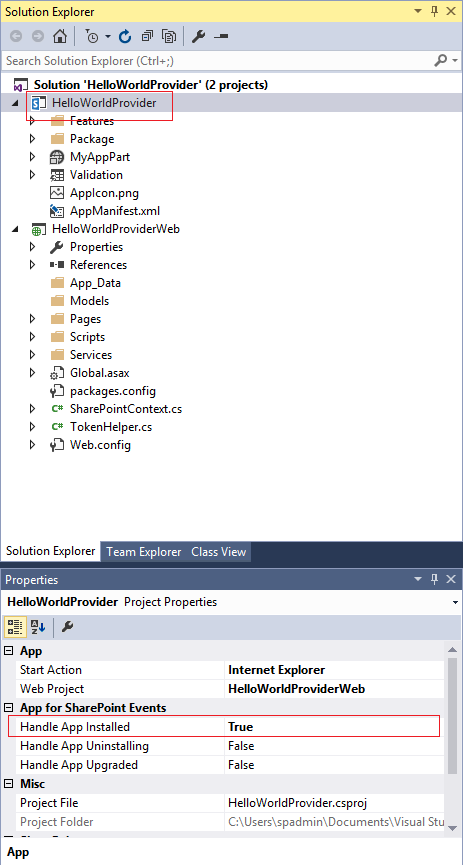
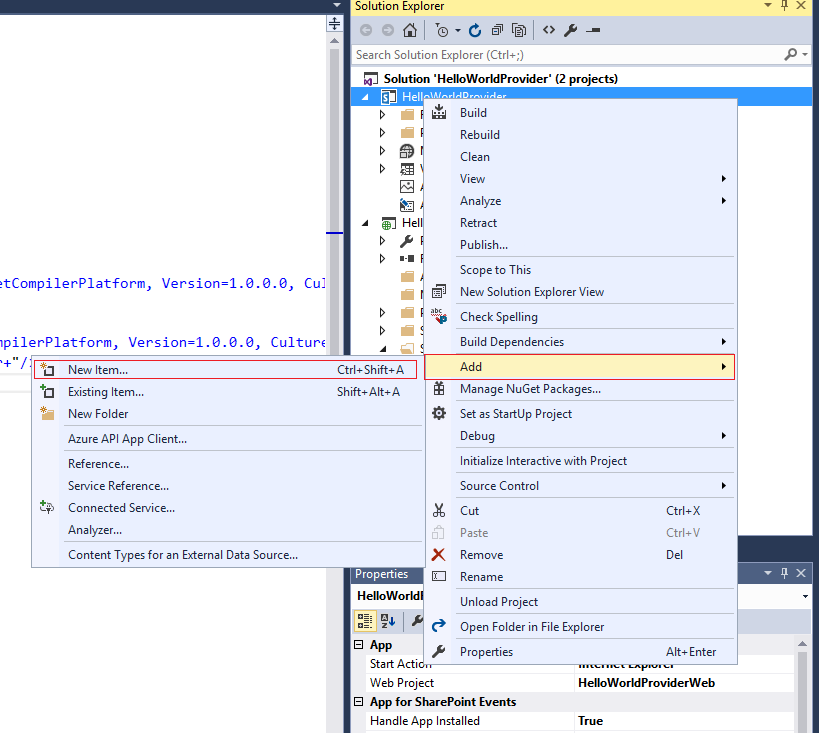
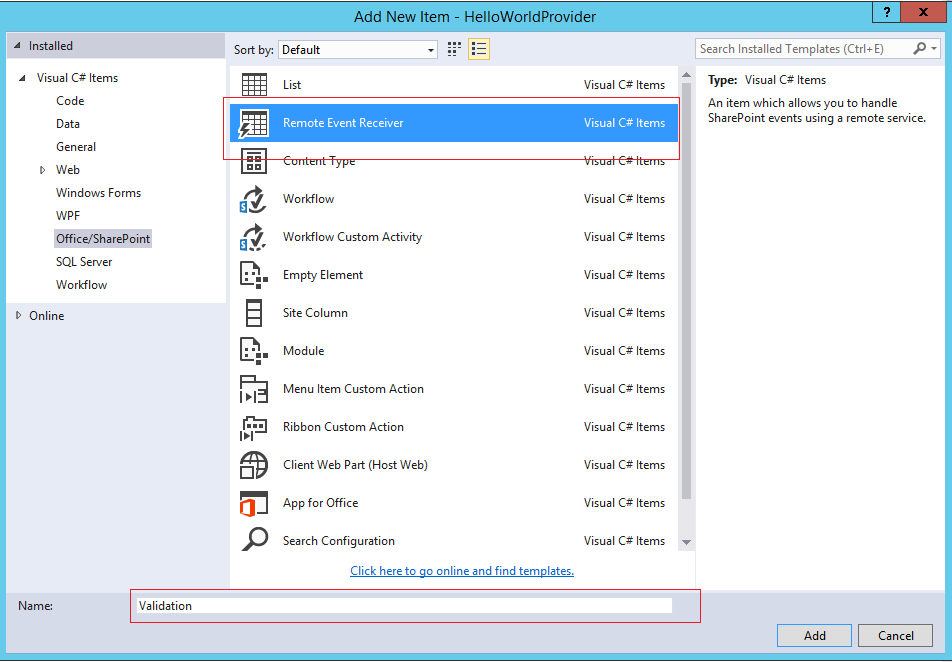
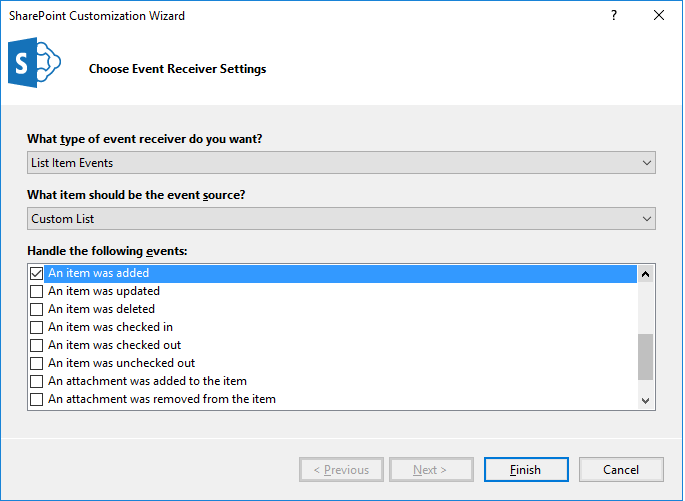
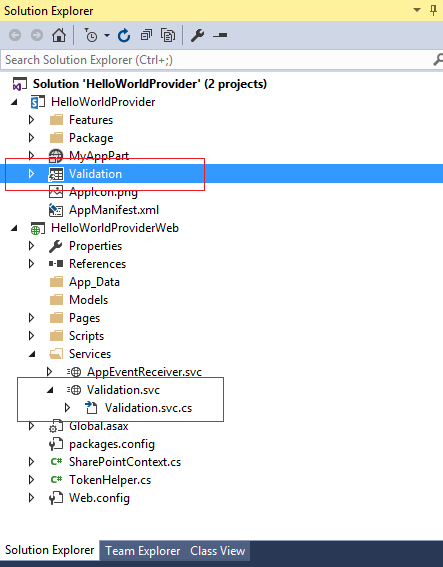
Step 2 – To Add Remote Event Receiver to project
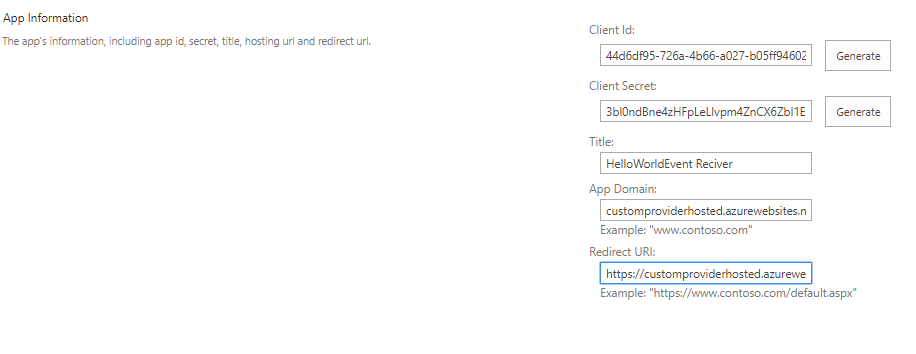
Step 3 – To Generate Client ID & Client Secret
Step 4 – To Add Code to AppEventReceiver
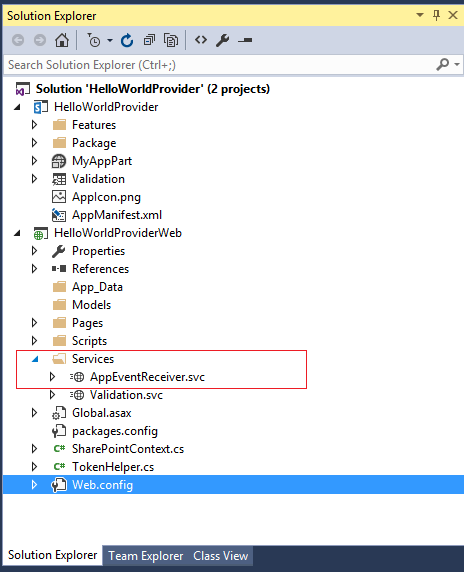
In ASP.Net Web forms project inside the service folder’s AppEventReceiver.svc.cs file, we will add the code to attach the event receiver to the host list. The code will be added in the ProcessEvent event for the AppInstalled event.
public SPRemoteEventResult ProcessEvent(SPRemoteEventProperties properties)

{

try

{

SPRemoteEventResult result = new SPRemoteEventResult();


using (ClientContext clientContext = TokenHelper.CreateAppEventClientContext(properties, useAppWeb: false))

{

if (clientContext != null)

{

clientContext.Load(clientContext.Web);

clientContext.ExecuteQuery();


if (properties.EventType == SPRemoteEventType.AppInstalled)

{

//Get reference to the host web list with name Feedback

var documentsList = clientContext.Web.Lists.GetByTitle("MDLIB");

clientContext.Load(documentsList);

clientContext.ExecuteQuery();

string remoteUrl = "https://customproviderhosted.azurewebsites.net/Services/Validation.svc";

//Create the remote event receiver definition

EventReceiverDefinitionCreationInformation remoteEventReceiver1ItemAdded = new EventReceiverDefinitionCreationInformation()

{

EventType = EventReceiverType.ItemUpdated,

ReceiverAssembly = Assembly.GetExecutingAssembly().FullName,

ReceiverName = "ValidationItemAdded",

ReceiverClass = "Validation",

ReceiverUrl = remoteUrl,

SequenceNumber = 10000,

};


//Add the remote event receiver to the host web list

documentsList.EventReceivers.Add(remoteEventReceiver1ItemAdded);

clientContext.ExecuteQuery();

}

}

}

}

catch (Exception ex) {

SPDiagnosticsService.Local.WriteTrace(0, new SPDiagnosticsCategory("Remote Event Receiver - Error Report", TraceSeverity.High, EventSeverity.ErrorCritical), TraceSeverity.High, ex.Message, string.Empty);

}

return result;

}
|
Above code will attach remote event receiver to the list named “MDLIB” which will be in host web (i.e. where provider hosted app is going to be installed).
Step 5 – To Add Code to Validation Remote Event Receiver
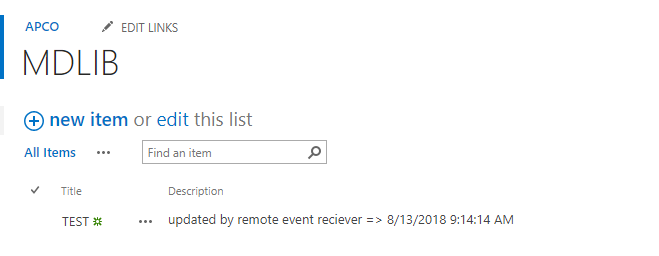
In ASP.Net web forms project inside the service folder’s Validation.svc.cs file, we will add the code to instruct event receiver to updated description field of ‘MDLIB’ list when item added.
The code will be added in the ProcessOneWayEvent event.
public void ProcessOneWayEvent(SPRemoteEventProperties properties)

{

if (properties.EventType == SPRemoteEventType.ItemAdded)

{

using (ClientContext clientContext = TokenHelper.CreateRemoteEventReceiverClientContext(properties))

{

if (clientContext != null)

{

try

{


List lstDemoeventReceiver = clientContext.Web.Lists.GetByTitle(properties.ItemEventProperties.ListTitle);

ListItem itemDemoventReceiver = lstDemoeventReceiver.GetItemById(properties.ItemEventProperties.ListItemId);


itemDemoventReceiver["Description"] = " updated by remote event reciever =>; " + DateTime.Now.ToString();

itemDemoventReceiver.Update();

clientContext.ExecuteQuery();

}

catch (Exception ex) {

SPDiagnosticsService.Local.WriteTrace(0, new SPDiagnosticsCategory("Remote Event Receiver - Error Report", TraceSeverity.High, EventSeverity.ErrorCritical), TraceSeverity.High, ex.Message, string.Empty);

}

}

}

}

}
|
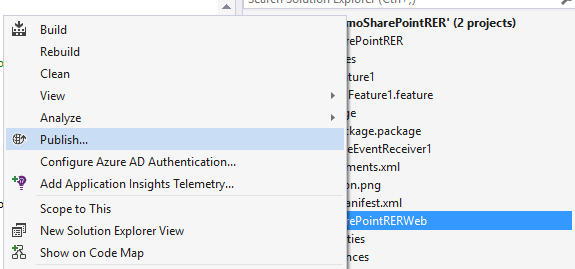
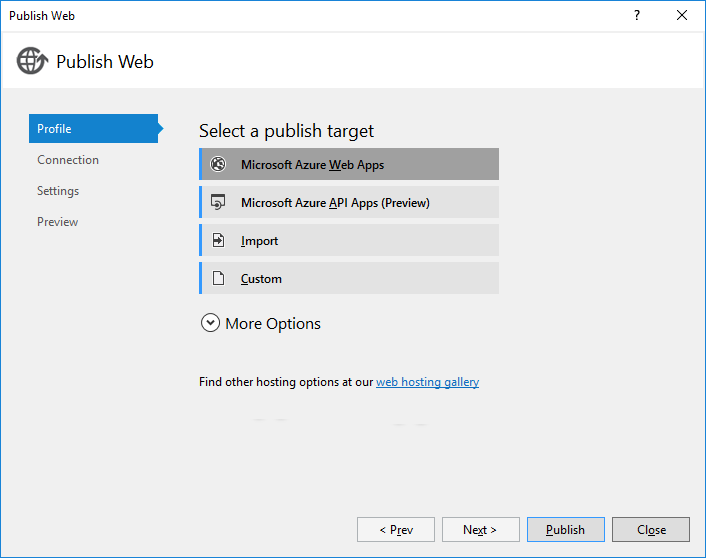
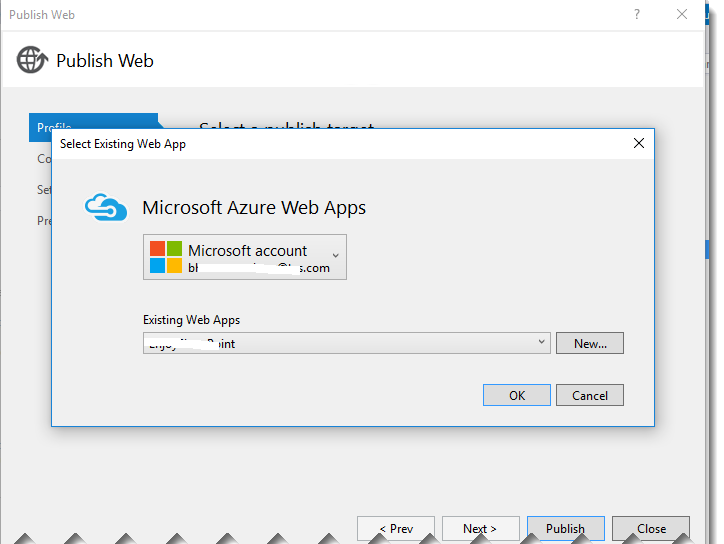
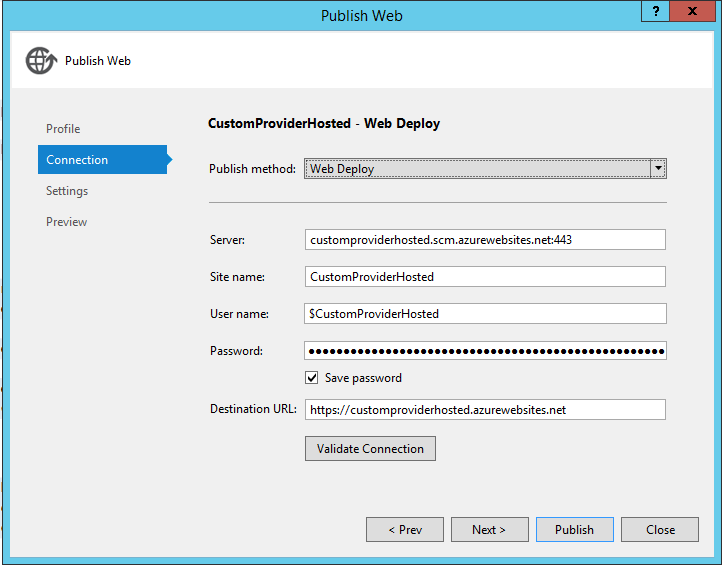
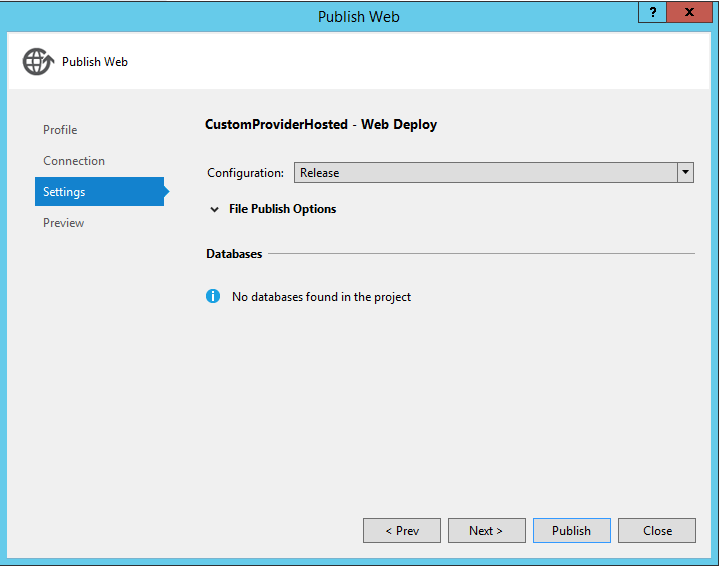
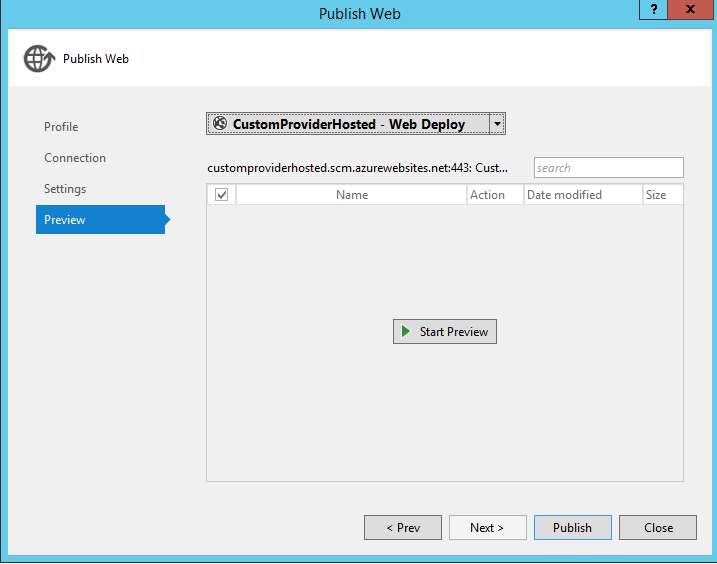
Step 6 – To Deploy Provider Hosted App to Azure
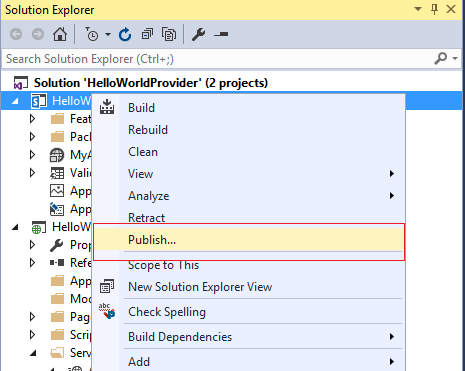
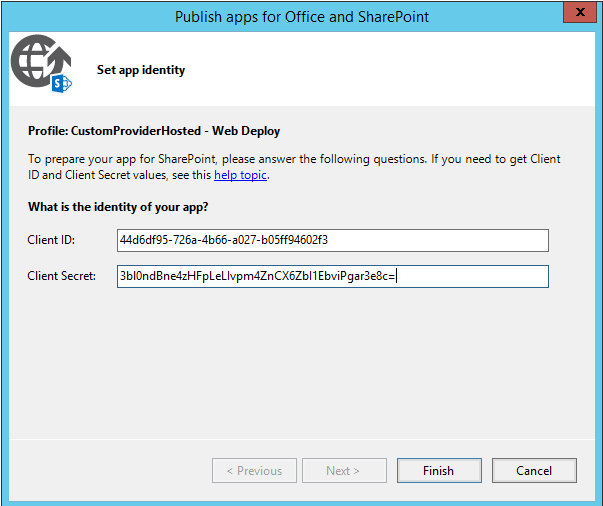
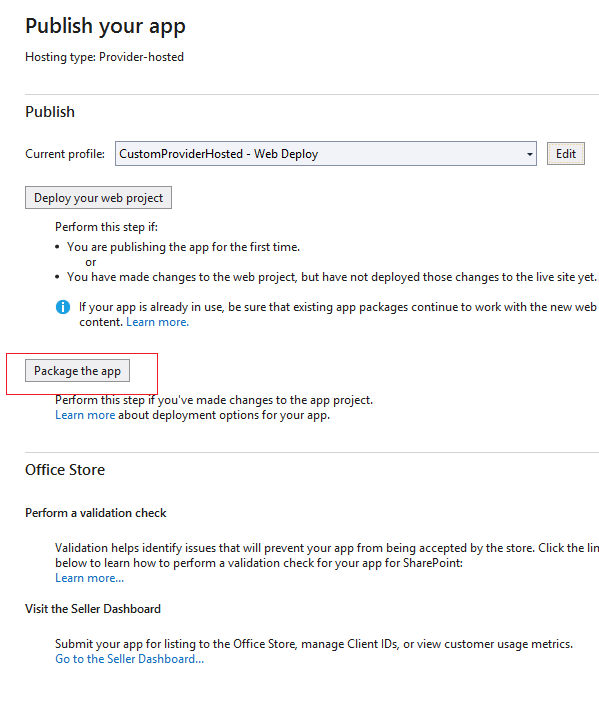
Step 7 – To Publish App Package
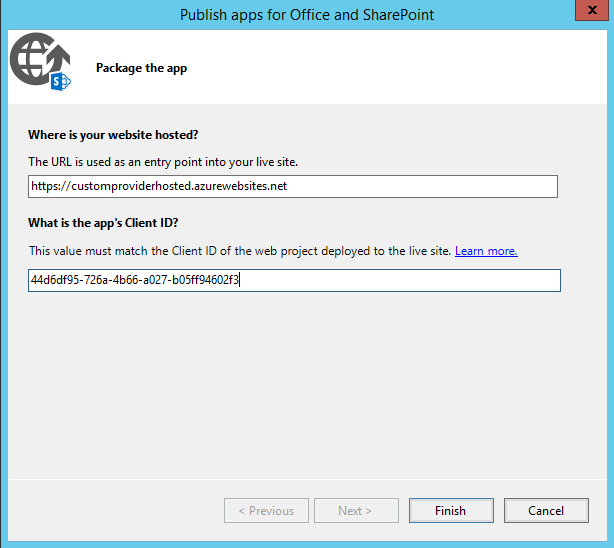
Now asp.net web project is published to azure web portal, now it’s time to prepare package for the SharePoint add-in.
Reference Sites:
Step 8 – To Test Remote Event Receiver
Conclusion
For the challenges part, there are few of them if the development is done using SharePoint Designer Workflow, but for Provider Hosted app it is way easier and safer as the business logic is not disclosed openly because it is hosted on separate individual server. Though details of each log can’t be maintained on the server as it is an individual server, yet the process is more streamlined and robust.
